Bitbucket integration
You can configure your Bitbucket repository to automatically build and deploy an environment when you push code changes. This integration synchronizes your Bitbucket repository with your Magento Commerce Cloud account.
We strongly recommend using a private repository for your Magento Commerce Cloud project to protect any proprietary information or development work, such as extensions and sensitive configurations.
Prerequisites
- Administrator access to the Magento Commerce Cloud project
magento-cloudCLI tool in your local environment- A Bitbucket account
- Administrator access to the Bitbucket repository
- An SSH access key for the Bitbucket repository
Prepare your repository
You must clone your Magento Commerce Cloud project from an existing environment and migrate the project branches to a new, empty Bitbucket repository, preserving the same branch names. It is critical to retain an identical Git tree, so that you do not lose any existing environments or branches in your Magento Commerce Cloud project.
-
From the terminal, log in to your Magento Commerce Cloud project.
1
magento-cloud login
-
List your projects and copy the project ID.
1
magento-cloud project:list
-
Clone the project to your local environment.
1
magento-cloud project:get <project-ID>
-
Add your Bitbucket repository as a remote.
1
git remote add origin git@bitbucket.org:<user-name>/<repo-name>.git
-
Delete the default
magentoremote.1
git remote remove magento
-
Verify that you added the Bitbucket remote correctly.
1
git remote -v
You should see the following:
1
2
origin git@bitbucket.org:<user-name>/<repo-name>.git (fetch)
origin git@bitbucket.org:<user-name>/<repo-name>.git (push)
-
Push the project files to your new Bitbucket repository. Remember to keep all branch names the same.
1
git push -u origin master
If you are starting with a new Bitbucket repository, you may have to use the
-foption, because the remote repository does not match your local copy. -
Verify that your Bitbucket repository contains all of your project files.
Create an OAuth consumer
The Bitbucket integration requires an OAuth consumer. You need the OAuth key and secret from this consumer to complete the next section.
To create an OAuth consumer in Bitbucket:
-
Log in to your Bitbucket account.
-
Click Settings > Access Management > OAuth.
-
Click Add consumer and configure it as follows:
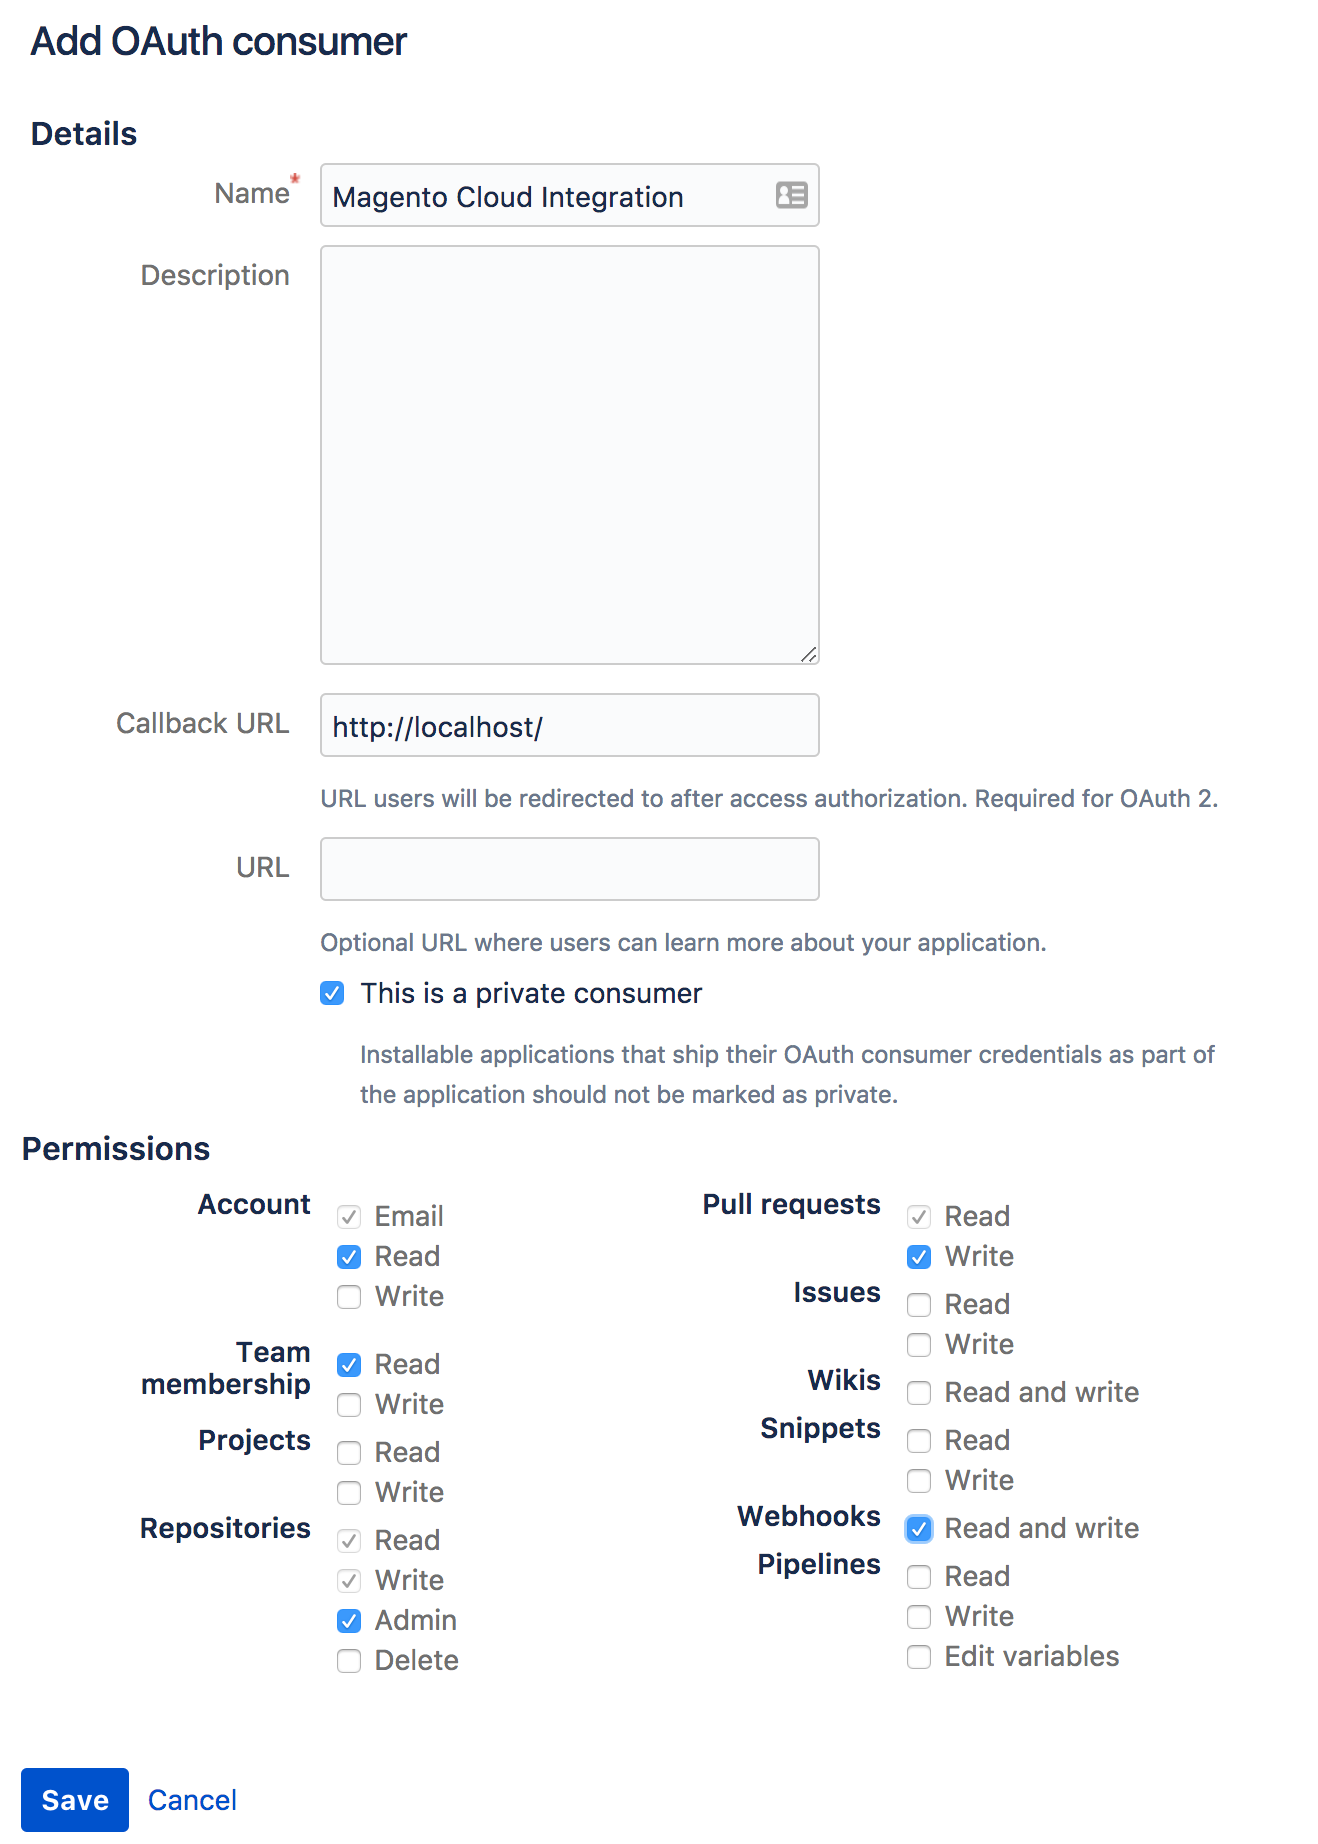
A valid Callback URL is not required, but you must enter a value in this field to successfully complete the integration.
-
Click Save.
-
Click the consumer Name to reveal your OAuth
keyandsecret. -
Copy your OAuth
keyandsecretfor configuring the integration.
Configure the integration
-
From the terminal, navigate to your Magento Commerce Cloud project.
-
Create a temporary file called
bitbucket.jsonand add the following, replacing the variables in angle brackets with your values:1 2 3 4 5 6 7 8 9 10 11 12
{ "type": "bitbucket", "repository": "<bitbucket-user-name/bitbucket-repo-name>", "app_credentials": { "key": "<oauth-consumer-key>", "secret": "<oauth-consumer-secret>" }, "prune_branches": true, "fetch_branches": true, "build_pull_requests": true, "resync_pull_requests": true }
Be sure to use the name of your Bitbucket repository and not the URL. The integration fails if you use a URL.
-
Add the integration to your project using the
magento-cloudCLI tool.The following command overwrites all code in your Magento Commerce Cloud project with code from your Bitbucket repository. This includes all branches, including the Production branch. This action happens instantly and cannot be undone. As a best practice, it is very important to clone all of your branches from your Magento Commerce Cloud project and push them to your Bitbucket repository before adding the Bitbucket integration.
1
magento-cloud project:curl -p '<project-ID>' /integrations -i -X POST -d "$(< bitbucket.json)"
This returns a long HTTP response with headers. A successful integration returns a 200 or 201 status code. A status of 400 or above indicates that an error occurred.
-
Delete the temporary
bitbucket.jsonfile. -
Verify the project integration.
1
magento-cloud integrations -p '<project-ID>'
1
2
3
4
5
6
7
+----------+-----------+--------------------------------------------------------------------------------+
| ID       | Type      | Summary                                                                        |
+----------+-----------+--------------------------------------------------------------------------------+
| <int-id> | bitbucket | Repository: bitbucket_Account/magento-int                                      |
|          |           | Hook URL:                                                                      |
|          |           | https://magento-url.cloud/api/projects/<project-id>/integrations/<int-id>/hook |
+----------+-----------+--------------------------------------------------------------------------------+
Make a note of the Hook URL to configure a webhook in BitBucket.
Add a webhook in BitBucket
In order to communicate events—such as a push—with your Cloud Git server, you need to create a webhook for your BitBucket repository.
-
Log in to your Bitbucket account.
-
Click Repositories and select your project.
-
Click Settings > Workflow > Webhooks.
-
Click Add webhook.
-
In the Add new webhook view, edit the following fields:
- Title: Magento Cloud Integration
- URL: Use the Hook URL from your
magento-cloudintegration list - Triggers: The default is a basic Repository push
-
Click Save.
Test the integration
After configuring the Bitbucket integration, test it by pushing a simple change to your Bitbucket repository.
-
Create a test file.
1
touch test.md -
Commit and push the change to your Bitbucket repository.
1
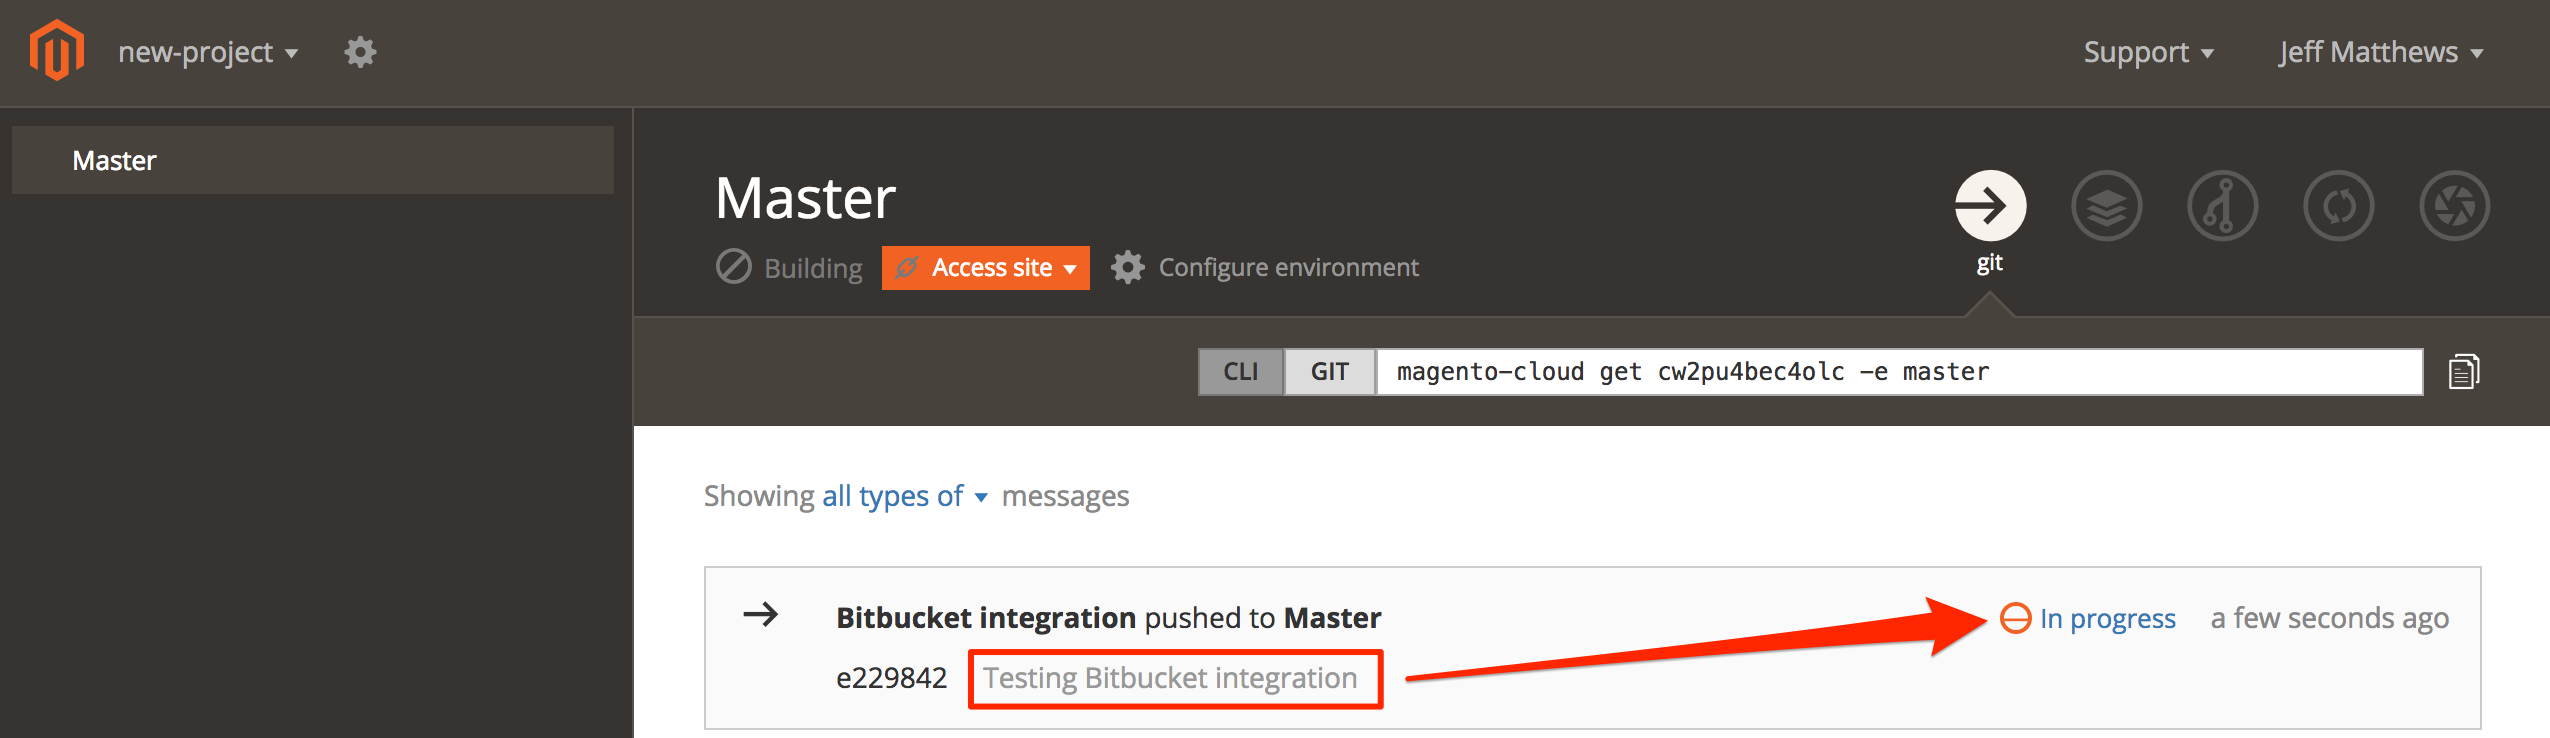
git add . && git commit -m "Testing Bitbucket integration" && git push
-
Log in to the Project Web Interface and verify that your commit message is displayed and your project deploying.
Create a new Cloud branch
The Bitbucket integration cannot activate new environments in your Magento Commerce Cloud project. If you create an environment with Bitbucket, you must activate the environment manually. To avoid this extra step, it is best practice to create environments using the magento-cloud CLI tool or the Project Web UI.
To activate a branch created with Bitbucket:
-
Use the magento-cloud CLI to push the branch.
1
magento-cloud environment:push from-bitbucket
1 2 3 4
Pushing from-bitbucket to the new environment from-bitbucket Activate from-bitbucket after pushing? [Y/n] y Parent environment [master]: integration --- (Validation and activation messages) -
Verify the environment is active.
1
magento-cloud environment:list
1
2
3
4
5
6
7
8
9
Your environments are:
+---------------------+----------------+--------+
| ID                  | Name           | Status |
+---------------------+----------------+--------+
| master              | Master         | Active |
|  integration        | integration    | Active |
|    from-bitbucket * | from-bitbucket | Active |
+---------------------+----------------+--------+
* - Indicates the current environment
After you create a new environment, you can push the corresponding branch to your remote Bitbucket repository using regular Git commands. Subsequent changes to your branch in Bitbucket automatically build and deploy the environment.
Remove the integration
You can safely remove the Bitbucket integration from your project without affecting your code.
To remove the Bitbucket integration:
-
From the terminal, log in to your Magento Commerce Cloud project.
-
List your integrations. You need the Bitbucket integration ID to complete the next step.
1
magento-cloud integration:list
-
Delete the integration.
1
magento-cloud integration:delete <project-ID>
Also, you can remove the Bitbucket integration by logging in to your Bitbucket account and revoking the OAuth grant on the account Settings page.