Clone and branch the project
Previous step
Set up the Magento file system owner
The Magento Commerce Cloud project is a Git repository of Magento code. Each active branch in the Integration environment includes a database and services to fully access the Magento site and store. You can clone the project and create an active branch from the Integration environment to develop code and add extensions using your local workstation.
Clone the project
The following instructions use a combination of Magento Cloud CLI commands and Git commands to clone a master environment from your project to your local workstation. To see a full list of Magento Cloud CLI commands, use the magento-cloud list command.
Some Git commands cannot complete an action in your Magento Commerce Cloud project. For example, you can create a new branch using a Git command, but you cannot create and activate a new environment using the git checkout -b <branch-name> command. You must create an environment using the magento-cloud environment:branch <branch-name> command for the environment to become active. Alternatively, you can use the Project Web UI to create active environments. See Magento CLI reference.
To clone a project master environment:
-
Log in to your local workstation with a Magento file system owner account.
-
Change to the web server or virtual host docroot directory.
-
Log in to the Magento Cloud CLI.
1
magento-cloud login
-
List your projects.
1
magento-cloud project:list
-
Clone a project.
1
magento-cloud project:get <project-ID>
When prompted for a directory name, enter
magento2. -
Change to the
magento2directory. -
List available environments for the project.
1
magento-cloud environment:list
The
magento-cloud environment:listcommand displays environment hierarchies, whereas thegit branchcommand does not. -
Fetch the remote branches.
1
git fetch magento
-
Pull updated code.
1
git pull magento <environment-ID>
Change the Magento ADMIN variables
We recommend changing the environment-level variables for the Magento Admin URL and administrator account. It is a best practice to configure these settings for security reasons prior to branching from the cloned master environment. All branches created from the master branch inherit the environment-level variables and their values.
- ADMIN_EMAIL—An email address for the administrative user. This address is used to send password reset notifications.
- ADMIN_USERNAME—A username for the administrative user with the ability to create other users, including administrative users. This username defaults to the License Owner email address. You can use the default value, or change it to a secure username.
- ADMIN_PASSWORD—A password for the administrative user. When the project was created, the License Owner received a default password in email.
- ADMIN_URL— The relative URL to access the Admin panel, such as
<domain>/admin. For security reasons, we recommend you choose a value other thanadminorbackendor another term that is easy to guess.
Make note of any updated values so that you can use them to install Magento from the command line and to verify the installation. The values for the ADMIN_EMAIL, ADMIN_USERNAME, and ADMIN_PASSWORD variables are used only for installation.
If you are not sure that the master branch has all Magento Admin variables and settings configured, you can view a list of existing variables:
1
magento-cloud variables
1
2
3
4
5
6
7
8
9
10
11
12
13
14
15
16
17
18
19
20
21
Variables on the project Project-Name (<project-id>), environment <environment-name>:
+----------------------------+-------------+-------------------------------------+
| Name                       | Level       | Value                               |
+----------------------------+-------------+-------------------------------------+
| php:blackfire.agent_socket | project     | tcp://blackfire.magento.cloud:8307  |
| env:COMPOSER_AUTH          | project     | {                                   |
|                            |             |    "http-basic": {                  |
|                            |             |       "repo.magento.com": {         |
|                            |             |       "username":                   |
|                            |             | "<public-key>",                     |
|                            |             |       "password":                   |
|                            |             | "<private-key>"                     |
|                            |             |     }                               |
|                            |             |   }                                 |
|                            |             | }                                   |
| ADMIN_EMAIL                | project     | admin@123.com                       |
| ADMIN_EMAIL                | environment | admin@123.com                       |
| ADMIN_PASSWORD             | environment | password                            |
| ADMIN_URL                  | environment | admin123                            |
| ADMIN_USERNAME             | environment | admin                               |
+----------------------------+-------------+-------------------------------------+
You can use the magento-cloud CLI to set a variable:
1
magento-cloud vset <variable-name> <variable-value>
Every time you add or modify a variable using the web interface or the CLI, the branch automatically redeploys.
To add variables using the Project Web Interface:
-
Log in to your Magento Commerce Cloud account.
-
Click the Configure environment gear icon
 next to the Project name.
-
Select the Variables tab.
-
Click Add Variable.
-
Enter the Name and Value for the variable. For example, enter
ADMIN_EMAILand your License Owner email address or another accessible email for resetting the password for the default admin account.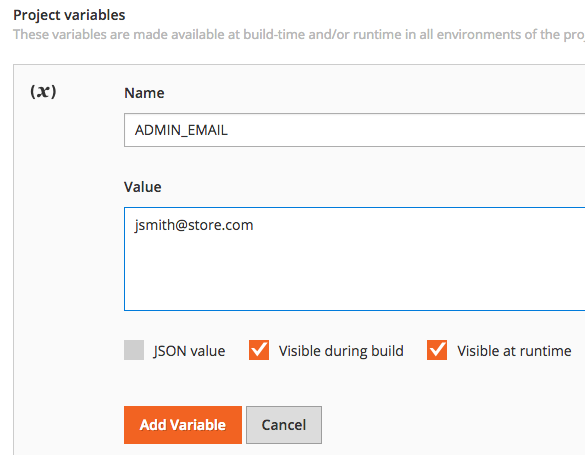
-
Click Add variable. After you add the variable, wait until deployment completes.
Create a branch for development
After cloning your project and updating the Magento administrator account configuration, you can branch for development. As stated earlier, you must create an environment using the magento-cloud environment:branch <branch-name> command or the Project Web Interface for the environment to become active.
- For Starter, consider creating a branch for
staging, then create a development branch based on thestagingbranch. - For Pro, create development branches based on the Integration environment.
To branch from master:
-
Create a new environment from the master branch.
1
magento-cloud branch <new-environment-name> master
-
Update dependencies.
1
composer --no-ansi --no-interaction install --no-progress --prefer-dist --optimize-autoloader
-
Create a snapshot of the environment.
1
magento-cloud snapshot:create -e <environment-ID>
Next step