Starter develop and deploy workflow
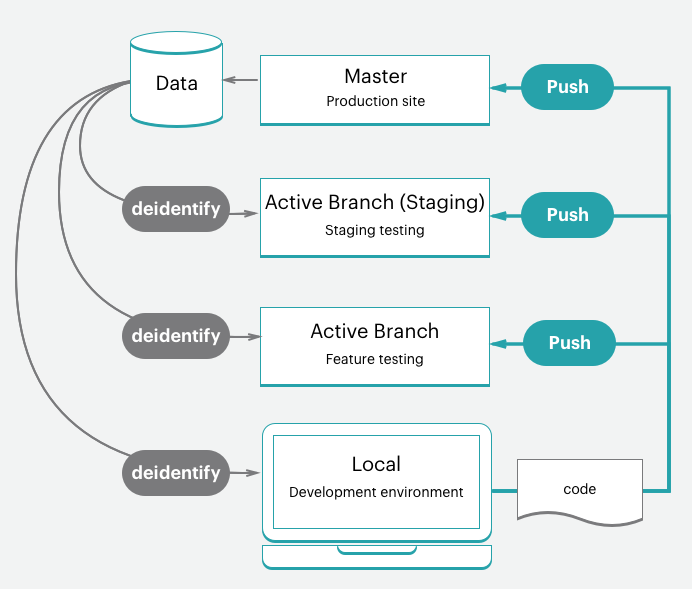
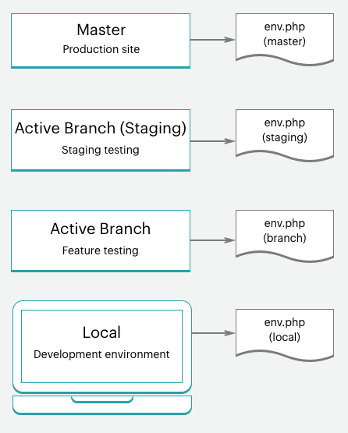
The Magento Commerce Cloud includes a single Git repository with a master branch for the Production environment that can be branched to create Staging and Integration environments for testing and development work. You can have up to four active environments, including a master environment for your production server. See Starter architecture for an overview.
For your environments, we recommend following a Development > Staging > Production workflow to develop and deploy your site.
- Production environment (live site)—Provides a full Production environment with all services built and deployed from the code on the
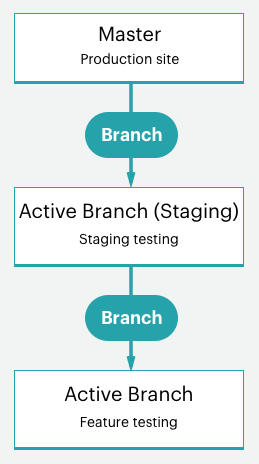
masterbranch. - Staging environment—Provides a full Staging environment that matches the Production environment with all services built and deployed from a
stagingbranch that you create by cloning frommaster. - Integration environments—Provides up to two active development environments that you create from the
stagingbranch. The Integration environment does not support third-party services like Fastly and New Relic.
For your branches, you can follow any development methodology. For example, you can follow an Agile methodology such as scrum to create branches for every sprint.
From each sprint, you can create branches for every user story. All the stories become testable. You can continually merge to the sprint branch and validate that branch on a continuous basis. When the sprint ends, you can merge the sprint branch to master to deploy all sprint changes to production without having to deal with a testing bottleneck.
Development workflow
Development and deployment on Starter plans begin with your initial project. You create your project with the “blank site”, which is a Magento Commerce Cloud template code repo with a fully prepared store. This creates a master branch with a copy of the code from your Production environment.
The development workflow uses the following process:
- Clone and branch from the
masterto createstagingand development branches - Develop code and install extensions locally in a development branch
- Configure your store and extension settings
- Generate configuration management files
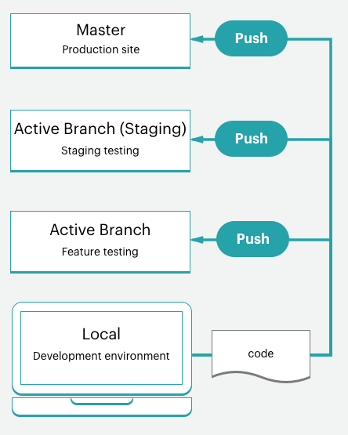
- Push code and configuration to build and deploy to the Staging and Production environments
You also have a few optional steps to help develop and test your code and your store data:
- Install sample data to your store
- Pull production store data down to environments
This process assumes that you have set up your local developer workspace.
Clone and branch
For a new Starter Plan project, a master branch was cloned from the Magento Commerce Cloud Git repository. To start branching and working with code, you need to clone the master branch to your local environment.
The format of the Git clone command is:
1
git fetch origin
1
git pull origin <environment ID>
The first time you start working in branches for your Starter project, you need to create a staging branch. This creates a code branch matching the master branch that deploys to a Staging environment to test configuration and code changes before deploying to the Production environment.
Next, create branches from staging to develop code, add extensions, and configure 3rd party integrations. Anytime you need to develop custom code, add extensions, integrate with a 3rd party service, work in a development branch created from the staging branch. You will have four active Integration environments available. When you push an active branch, one of these Integration environments automatically deploys your code to test.
We walk you through the process when you set up your local environment.
The format of the Git branch command is:
1
git checkout <branch name>
The format of the Magento Cloud CLI branch command is:
1
magento-cloud environment:branch <environment name> <parent environment ID>
Develop code
It’s the time you have been waiting for…writing code. Using this base branch of Magento Commerce Cloud code, you can start installing extensions, developing custom code, adding themes, and much more.
We recommend using a branching strategy with your development work. Using one branch to do all of your work all at once might make testing difficult. For example, you could follow continuous integration and sprint methodologies to work:
- Add a few extensions and configure them with your first branch
- Push this code, test, and merge to Staging then Production
- Fully configure your services in
services.yamland add a theme - Push this code, test, and merge to Staging then Production
- Integrate with a 3rd party service
- Push this code, test, and merge to Staging then Production
And so on until you have your store fully built, configured, and ready to go live. But keep reading, we have even better options for your store and code configuration!
Do not complete any configurations in your local workstation yet.
Configure store
When you are ready to configure your store, push all your code to the Integration environment. Configure your store settings from the Magento Admin panel for the Integration environment, not in your local environment. You can find the URL in the Project Web Interface. The Store Admin URL is located on the branch page.
For the best information on configurations, review the documentation for Magento Commerce and the installed extensions. Here are some links and ideas to help you get kickstarted:
- Best practices for store configuration for specific best practices in the cloud
- Basic configuration for store admin access, name, languages, currencies, branding, sites, store views and more
- Theme for your look and feel of the site and stores including CSS and layouts
- System configuration for roles, tools, notifications, and your encryption key for your database
- Extension settings using their documentation
Beyond just store settings, you can further configure multiple sites and stores, configured services, and more. See Configure Magento Commerce.
Now you need to get these settings into your code. We have a helpful command to do this, keep reading.
Generate configuration management files
If you are familiar with Magento, you may be concerned about how to get your configuration settings from your database in development to the Staging and Production environments. Previously, you had to copy all your configuration settings down on paper or to a file, and then manually apply the settings to other environments. Or you may have dumped your database and pushed that data to another environment.
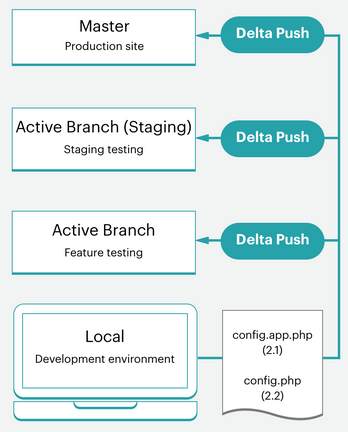
Magento Commerce Cloud provides a set of two Configuration Management commands that export configuration settings from your environment into a file. These commands are only available for Magento Commerce Cloud 2.2 and later.
php .vendor/bin/m2-ece-scd-dump: Recommended. Exports only the configuration settings you have entered or modified from defaults into a configuration file.php bin/magento app:config:dump: Exports every configuration setting, including modified and default, into a configuration file.
The generated file is app/etc/config.php.
You generate the file in the Integration environment where you configured Magento. We walk you through the process of generating the file, adding it to your branch, and deploying it.
Important notes on Configuration Management:
-
Any configuration setting included in the file generated from the
app:config:dumpcommand is locked from editing, or read-only, in the deployed environment. This is one reason we recommend using the.vendor/bin/m2-ece-scd-dumpcommand.For example, we will have you install a module for Fastly in your development environment. You can only configure this module in the Staging and Production environment. Using the
.vendor/bin/m2-ece-scd-dumpcommand keeps those default fields editable when you deploy your development changes to the Staging and Production environment. -
The generated file can be long depending on the size of your deployment. The
.vendor/bin/m2-ece-scd-dumpcommand generates a much smaller file than the file generated by theapp:config:dumpcommand.
If you are using Magento Commerce Cloud version 2.2 or later, the configuration management commands provide an additional feature to protect sensitive data, like sandbox credentials for a PayPal module. During the export process, any values that contain sensitive data are exported to separate configuration file—env.php in the app/etc/ directory. This file remains in your local environment and does not get copied when you push your code to another branch. You can also create environment variables with CLI commands in all Magento Commerce Cloud versions.
For more information, see Configuration Management.
Push code and test
At this point, you should have a developed code branch with a configuration file (config.local.php or config.php) ready to test.
Every time you push code from your local environment, a series of build and deploy scripts run. These scripts generate new Magento code and deploy it to the remote environment. For example, if you are pushing a development branch from your local environment to the remote branch, a matching environment updates services, code, and static content.
You can directly access this environment with a store URL, Magento Admin URL, and SSH. These environments include a web server, database, and configured services. When ready, you can start deploying and testing in the Staging environment.
For more information, see Deployment workflow.
Optional: Install sample data
If you need some example data when developing your store, you can install our sample data. This data simulates an active Magento store, including customers, products, and other data. This sample data works best with a “blank site” Magento Commerce Cloud template installation when creating your project.
We recommend installing sample data in your local and Integration environments. If you use this data in Staging or Production, you need to remove the sample information and products before going live.
For instructions, see Install optional sample data.
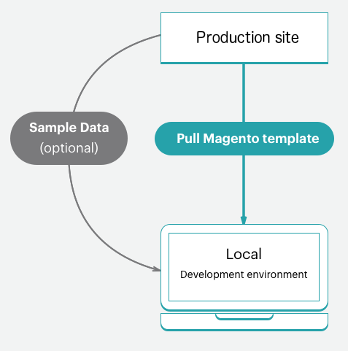
Optional: Pull production data
We recommend adding all of your products, catalogs, site content, and so on directly to the Production environment. By adding this data to the Production environment, you can provide updated prices, coupons, inventory stock, sales announcements, information about future offerings, and much more for your customers. This data does not include extension configurations, which you configure in your local development branch.
As you develop features, add extensions, and design themes, having real data to work with is helpful. At any time, you can create a database dump from the Production environment and push that to your Staging and Integration environments as needed.
To help export Production data as test data to use in Staging and Integration environments, Run the support utilities:
- CLI commands (Recommended) to export a protected backup of customer and store data using your Magento encryption key
- Data Collection tool for generating and exporting data
To migrate this data, see Migrate and deploy static files and data.
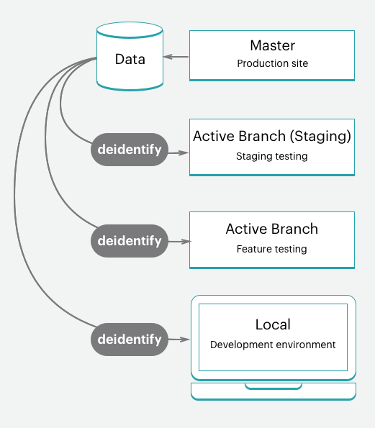
Before pushing the data to another environment, you should consider sanitizing your data. You have a couple of options including using support utilities or developing a script to scrub out customer data.
We do not recommend pushing a database from an Integration or Staging environment to a Production environment. If you do, the data from the Integration or Staging environment overwrites your live Production data including sales, orders, new and updated customers, and much more.
Deployment workflow
As we detailed in the architecture information, Magento Commerce Cloud is Git driven. Deploying Magento Commerce Cloud is part of your Git push processes for branches.
When you push branched code from your local environment to the remote branch, a series of build and deploy scripts begin.
Build scripts:
- Your site on the target environment continue running during a build
- Check and run Magento Commerce Cloud patches and hotfixes
- Compile your code with a build and deploy log
- Check for Configuration Management, if there static content deploy occurs during this phase
- Create or use a slug of unchanged code to speed up the process
- Provision all backend services and applications
Deploy scripts:
- Puts your site on the target environment in Maintenance mode
- Deploys static content if not completed during Build
- Installs or updates Magento Commerce Cloud
- Configure routing for traffic
When fully completed, your store comes back online, live, with all of your updated code and configurations.
To learn more, see Deployment process.
Push to Staging and test
You should always push all of your code in iterations to your Staging environment for full testing. The first time you use this environment, you will need to configure a few services including Fastly, Blackfire Profiler, and New Relic. We also recommend configuring payment gateways, shipping, notifications, and other vital services with sandbox or testing credentials.
Staging is a pre-production environment, providing all services and settings as close to Production as possible. Thoroughly test every service, verify your performance testing tools, perform UAT testing as an administrator and customers, until you feel your store is ready for Production.
To learn more, see Deploy your store.
Push to Master / Production
When you push to the master branch, you are pushing to the Production environment. Complete configuration and testing activities in the Production environment like you did in the Staging environment with one important difference. In the Production environment use live credentials for during configuration and testing. The moment you go live and launch, customers must be able to complete purchases and administrators should be able to manage your live store.
To learn more, see Deploy your store.
Go live
We provide a clear walk-through for going live and launching, which requires more steps than pressing a button. After you complete these steps, your store can serve up products in your customized theme for sale immediately.
To learn more, check out Go live and launch.
Continuous integration
Following your branching and development methodologies, you can easily develop new features, configure changes, and add extensions to continuously develop and deploy updates.
Magento Commerce Cloud environments support continuous integration for constant updates. This workflow supports releases multiple times a day or on a set schedule according to your business needs.
- Create development branches with future features and changes
- Test the code in your development environments
- Deploy and test in Staging
- Deploy to Production
For more information, see Continuous integration.