Configure nginx and Elasticsearch
Overview of secure web server communication
This topic discusses an example of securing communication between your web server and Elasticsearch using a combination of Transport Layer Security (TLS) encryption and HTTP basic authentication. You can optionally configure other types of authentication as well; we provide references for that information.
(An older term, Secure Sockets Layer (SSL), is frequently used interchangeably with TLS. In this topic, we refer to TLS.)
Unless otherwise noted, all commands in this topic must be entered as a user with root privileges.
Recommendations
We recommend the following:
-
Your web server uses TLS.
TLS is beyond the scope of this topic; however, we strongly recommend you use a real certificate in production and not a self-signed certificate.
-
Elasticsearch runs on the same host as a web server. Running Elasticsearch and the web server on different hosts is beyond the scope of this topic.
The advantage of putting Elasticsearch and the web server on the same host is that it makes intercepting encrypted communication impossible. The Elasticsearch web server doesn’t have to be the same as the Magento web server; for example, Magento can run Apache and Elasticsearch can run nginx.
More information about TLS
See one of the following resources:
-
Apache
-
Nginx
Set up a proxy
This section discusses how to configure nginx as an unsecure proxy so that Magento can use Elasticsearch running on this server. This section does not discuss setting up HTTP Basic authentication; that is discussed in Secure communication with nginx.
The reason the proxy is not secured in this example is it’s easier to set up and verify. You can use TLS with this proxy if you want; to do so, make sure you add the proxy information to your secure server block configuration.
See one of the following sections for more information:
- Step 1: Specify additional configuration files in your global
nginx.conf - Step 2: Set up nginx as a proxy
Step 1: Specify additional configuration files in your global nginx.conf
Make sure your global /etc/nginx/nginx.conf contains the following line so it loads the other configuration files discussed in the following sections:
1
include /etc/nginx/conf.d/*.conf;
Step 2: Set up nginx as a proxy
This section discusses how to specify who can access the nginx server.
-
Use a text editor to create a new file
/etc/nginx/conf.d/magento_es_auth.confwith the following contents:1 2 3 4 5 6
server { listen 8080; location /_cluster/health { proxy_pass http://localhost:9200/_cluster/health; } }
-
Restart nginx:
1
service nginx restart
-
Verify the proxy works by entering the following command:
1
curl -i http://localhost:<proxy port>/_cluster/health
For example, if your proxy uses port 8080:
1
curl -i http://localhost:8080/_cluster/health
Messages similar to the following display to indicate success:
1
2
3
4
5
6
7
HTTP/1.1 200 OK
Date: Tue, 23 Feb 2016 20:38:03 GMT
Content-Type: application/json; charset=UTF-8
Content-Length: 389
Connection: keep-alive

{"cluster_name":"elasticsearch","status":"yellow","timed_out":false,"number_of_nodes":1,"number_of_data_nodes":1,"active_primary_shards":5,"active_shards":5,"relocating_shards":0,"initializing_shards":0,"unassigned_shards":5,"delayed_unassigned_shards":0,"number_of_pending_tasks":0,"number_of_in_flight_fetch":0,"task_max_waiting_in_queue_millis":0,"active_shards_percent_as_number":50.0}
-
Continue with the next section.
Configure Magento to use Elasticsearch
This section discusses the minimum settings you must choose to test Elasticsearch with Magento 2. For additional details about configuring Elasticsearch, see the Magento Commerce User Guide.
Magento 2.3.1 adds support for Elasticsearch 6.x, and it is enabled by default. Magento still provides modules for Elasticsearch 2.x and 5.x, but these must be enabled in order to use these versions. Elasticsearch 2.x is still available but strongly discouraged. Versions 2.x and 5.x are End of Life. If you must run Elasticsearch 2.x or 5.x with Magento 2.3.1, you must downgrade the Elasticsearch client to an older version. Follow the instructions in Change the Elasticsearch Client.
Configure Elasticsearch within Magento
To configure Magento to use Elasticsearch:
- Log in to the Magento Admin as an administrator.
- Click Stores > Settings > Configuration > Catalog > Catalog > Catalog Search.
- From the Search Engine list, select the correct Elasticsearch version as the following figure shows. (The Elasticsearch 5.0+/6.0+ options are not available for Magento 2.1.)
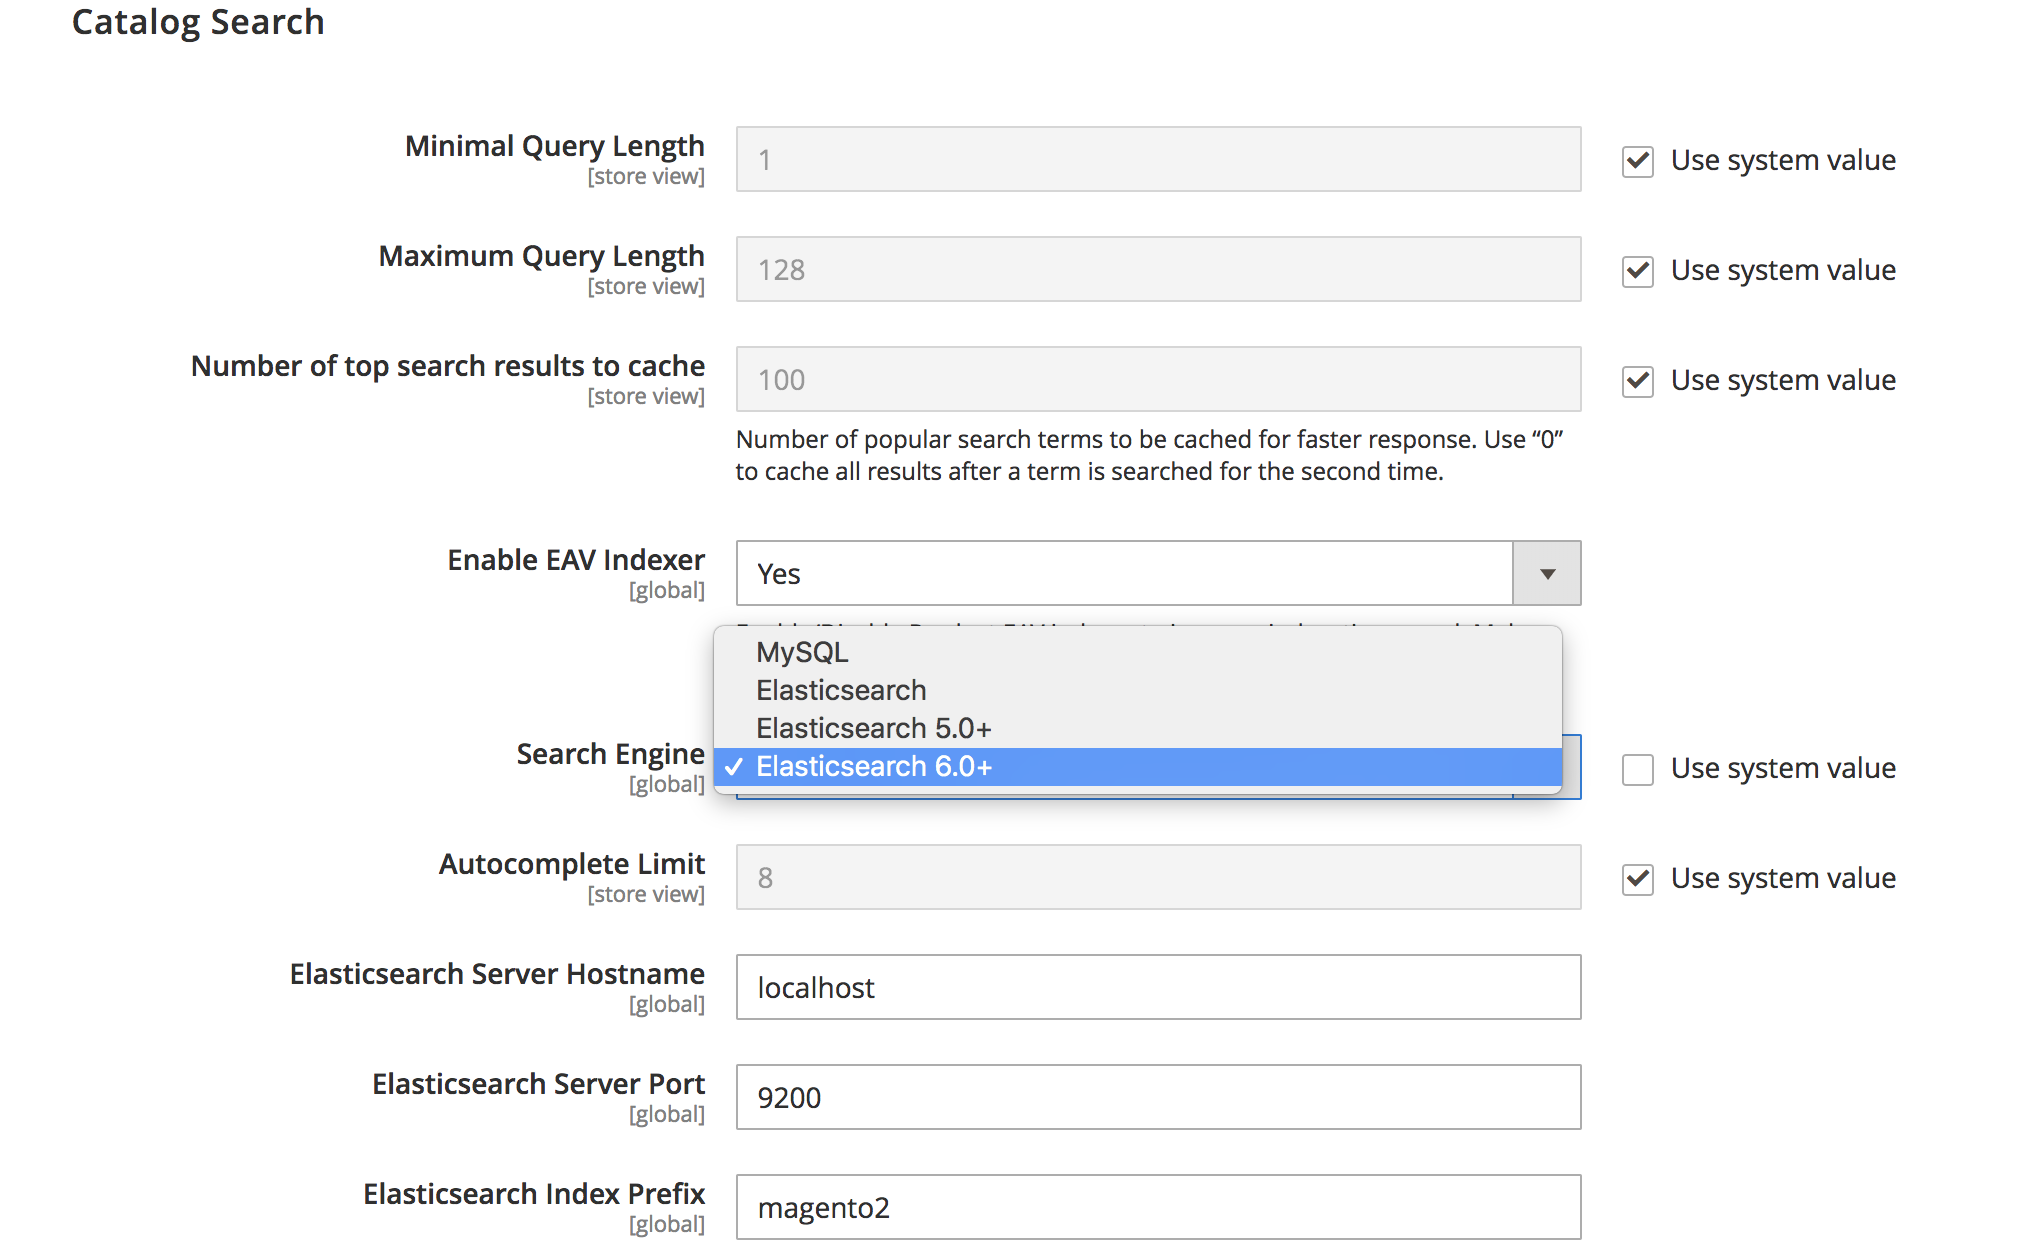
The following table lists the required configuration options to configure and test the connection with Magento. Unless you changed Elasticsearch server settings, the defaults should work. Skip to the next step.
| Option | Description |
|---|---|
| Elasticsearch Server Hostname | Enter the fully qualified hostname or IP address of the machine running Elasticsearch. Magento Commerce Cloud: Get this value from your integration system. |
| Elasticsearch Server Port | Enter the Elasticsearch web server proxy port. In our example, the port is 8080 but if you are using a secure proxy, it is typically 443. Magento Commerce Cloud: Get this value from your integration system. |
| Elasticsearch Index Prefix | Enter the Elasticsearch index prefix. If you use a single Elasticsearch instance for more than one Magento installation (Staging and Production environments), you must specify a unique prefix for each installation. Otherwise, you can use the default prefix magento2. |
| Enable Elasticsearch HTTP Auth | Click Yes only if you enabled authentication for your Elasticsearch server. If so, provide a username and password in the provided fields. |
- Click Test Connection.
You will see either:

Continue with:
or you will see:

If so, try the following:
- Make sure the Elasticsearch server is running.
- If the Elasticsearch server is on a different host from Magento, log in to the Magento server and ping the Elasticsearch host. Resolve network connectivity issues and test the connection again.
- Examine the command window in which you started Elasticsearch for stack traces and exceptions. You must resolve those before you continue. In particular, make sure you started Elasticsearch as a user with
rootprivileges. - Make sure that UNIX firewall and SELinux are both disabled, or set up rules to enable Elasticsearch and Magento to communicate with each other.
- Verify the value of the Elasticsearch Server Hostname field. Make sure the server is available. You can try the server’s IP address instead.
- Use the command
netstat -an | grep **listen-port**command to verify that the port specified in the Elasticsearch Server Port field is not being used by another process.
For example, to see if Elasticsearch is running on its default port, use the following command:
1
  netstat -an | grep 9200
If Elasticsearch is running on port 9200, it displays similar to the following:
tcp 0 0 :::9200 :::* LISTEN
Reindexing catalog search and refreshing the full page cache
After you change Magento’s Elasticsearch configuration, you must reindex the catalog search index and refresh the full page cache using the Admin or command line.
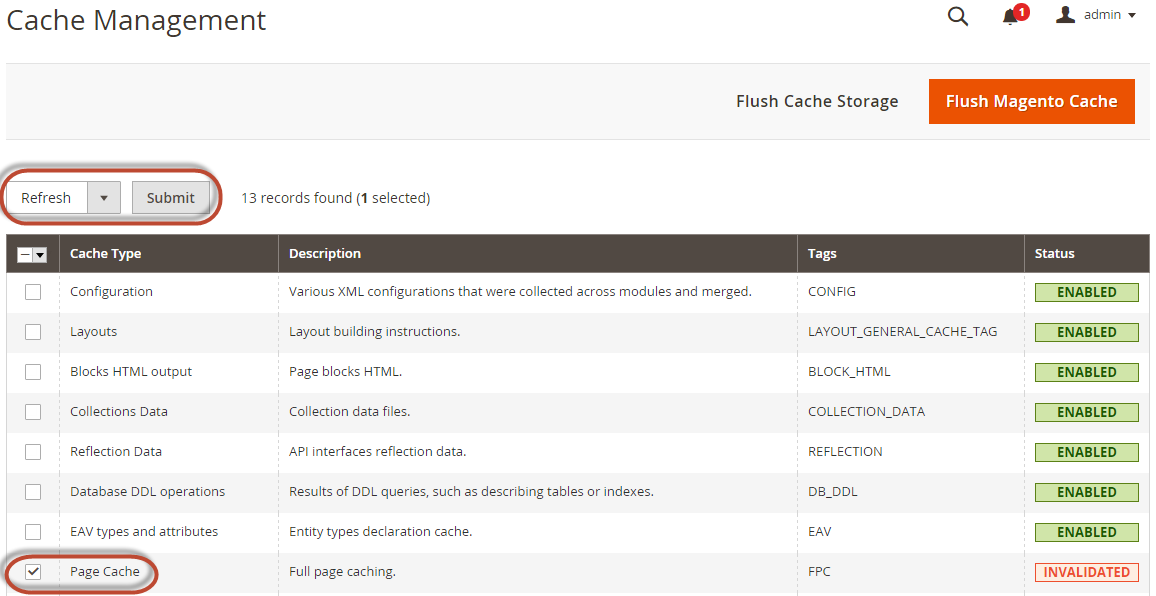
To refresh the cache using the Admin:
- In the Admin, click System > Cache Management.
- Select the checkbox next to Page Cache.
- From the Actions list in the upper right, click Refresh.
The following figure shows an example.
To clean the cache using the command line, use the magento cache:clean command.
To reindex using the command line:
- Log in to your Magento server as, or switch to, the Magento file system owner.
- Enter any of the following commands:
Enter the following command to reindex the catalog search index only:
1
bin/magento indexer:reindex catalogsearch_fulltext
Enter the following command to reindex all indexers:
1
bin/magento indexer:reindex
- Wait until reindexing completes.
Unlike the cache, indexers are updated by a cron job. Make sure cron is enabled before you start using Elasticsearch.
Secure communication with nginx
This section discusses how to set up HTTP Basic authentication with your secure proxy. Use of TLS and HTTP Basic authentication together prevents anyone from intercepting communication with Elasticsearch or with your Magento server.
Because nginx natively supports HTTP Basic authentication, we recommend it over, for example, Digest authentication, which isn’t recommended in production.
Additional resources:
- How To Set Up Password Authentication with Nginx on Ubuntu 14.04 (Digitalocean)
- Basic HTTP Authentication With Nginx (HowtoForge)
- Example Nginx Configurations for Elasticsearch
See the following sections for more information:
- Step 1: Create passwords
- Step 2: Set up access to nginx
- Step 3: Set up a restricted context for Elasticsearch
- Verify communication is secure
Step 1: Create a password
We recommend you use the Apache htpasswd command to encode passwords for a user with access to Elasticsearch (named magento_elasticsearch in this example).
To create a password:
-
Enter the following command to determine if
htpasswdis already installed:1
which htpasswd
If a path displays, it is installed; if the command returns no output,
htpasswdis not installed. -
If necessary, install
htpasswd:- Ubuntu:
apt-get -y install apache2-utils - CentOS:
yum -y install httpd-tools
- Ubuntu:
-
Create a
/etc/nginx/passwddirectory to store passwords:1
mkdir -p /etc/nginx/passwd
1
htpasswd -c /etc/nginx/passwd/.<filename> <username>
For security reasons,
<filename>should be hidden; that is, it must start with a period. -
(Optional). To add another user to your password file, enter the same command without the
-c(create) option:1
htpasswd /etc/nginx/passwd/.<filename> <username>
-
Verify that the contents of
/etc/nginx/passwdis correct.
Step 3: Set up access to nginx
This section discusses how to specify who can access the nginx server.
The example shown is for an unsecure proxy. To use a secure proxy, add the following contents (except the listen port) to your secure server block.
Use a text editor to modify either /etc/nginx/conf.d/magento_es_auth.conf (unsecure) or your secure server block with the following contents:
1
2
3
4
5
6
7
8
9
10
11
12
13
14
15
16
17
18
19
20
21
22
23
24
25
26
server {
  listen 8080;
  server_name 127.0.0.1;

  location / {
   limit_except HEAD {
      auth_basic "Restricted";
      auth_basic_user_file  /etc/nginx/passwd/.htpasswd_magento_elasticsearch;
   }
   proxy_pass http://127.0.0.1:9200;
   proxy_redirect off;
   proxy_set_header Host $host;
   proxy_set_header X-Forwarded-For $proxy_add_x_forwarded_for;
  }

  location /_aliases {
   auth_basic "Restricted";
   auth_basic_user_file  /etc/nginx/passwd/.htpasswd_magento_elasticsearch;
   proxy_pass http://127.0.0.1:9200;
   proxy_redirect off;
   proxy_set_header Host $host;
   proxy_set_header X-Forwarded-For $proxy_add_x_forwarded_for;
  }

  include /etc/nginx/auth/*.conf;
}
The Elasticsearch listen port shown in the preceding example are examples only. For security reasons, we recommend you use a non-default listen port for Elasticsearch.
Step 4: Set up a restricted context for Elasticsearch
This section discusses how to specify who can access the Elasticsearch server.
-
Enter the following command to create a new directory to store the authentication configuration:
1
mkdir /etc/nginx/auth/ -
Use a text editor to create a new file
/etc/nginx/auth/magento_elasticsearch.confwith the following contents:1 2 3 4 5 6 7 8 9
location /elasticsearch { auth_basic "Restricted - elasticsearch"; auth_basic_user_file /etc/nginx/passwd/.htpasswd_magento_elasticsearch; proxy_pass http://127.0.0.1:9200; proxy_redirect off; proxy_set_header Host $host; proxy_set_header X-Forwarded-For $proxy_add_x_forwarded_for; }
- If you set up a secure proxy, delete
/etc/nginx/conf.d/magento_es_auth.conf. -
Restart nginx and continue with the next section:
1
service nginx restart
Verify communication is secure
This section discusses two ways to verify that HTTP Basic authentication is working:
- Using a
curlcommand to verify you must enter a username and password to get cluster status - Configuring HTTP Basic authentication in the Magento Admin
Use a curl command to verify cluster status
Enter the following command:
1
curl -i http://<hostname, ip, or localhost>:<proxy port>/_cluster/health
For example, if you enter the command on the Elasticsearch server and your proxy uses port 8080:
1
curl -i http://localhost:8080/_cluster/health
The following message displays to indicate authentication failed:
1
2
3
4
5
6
7
8
9
10
11
12
13
14
HTTP/1.1 401 Unauthorized
Date: Tue, 23 Feb 2016 20:35:29 GMT
Content-Type: text/html
Content-Length: 194
Connection: keep-alive
WWW-Authenticate: Basic realm="Restricted"

<html>
<head><title>401 Authorization Required</title></head>
<body bgcolor="white">
  <center><h1>401 Authorization Required</h1></center>

</body>
</html>
Now try the following command:
1
curl -i -u <username>:<password> http://<hostname, ip, or localhost>:<proxy port>/_cluster/health
For example:
1
curl -i -u magento_elasticsearch:mypassword http://localhost:8080/_cluster/health
This time the command succeeds with a message similar to the following:
1
2
3
4
5
6
7
HTTP/1.1 200 OK
Date: Tue, 23 Feb 2016 20:38:03 GMT
Content-Type: application/json; charset=UTF-8
Content-Length: 389
Connection: keep-alive

{"cluster_name":"elasticsearch","status":"yellow","timed_out":false,"number_of_nodes":1,"number_of_data_nodes":1,"active_primary_shards":5,"active_shards":5,"relocating_shards":0,"initializing_shards":0,"unassigned_shards":5,"delayed_unassigned_shards":0,"number_of_pending_tasks":0,"number_of_in_flight_fetch":0,"task_max_waiting_in_queue_millis":0,"active_shards_percent_as_number":50.0}
Configure HTTP Basic authentication in the Magento Admin
Perform the same tasks as discussed in Configure Magento to use Elasticsearch except click Yes from the Enable Elasticsearch HTTP Auth list and enter your username and password in the provided fields.
Click Test Connection to make sure it works and then click Save Config.
You must flush the Magento cache and reindex before you continue.