Configure a custom cron job and cron group (tutorial)
This tutorial shows you step-by-step how to create a custom cron job and optionally a cron group in a sample module. You can use a module you already have or you can use a sample module from our magento2-samples repository.
Running the cron job results in a row being added to the cron_schedule table with the name of the cron job, custom_cron.
We also show you how to optionally create a cron group, which you can use to run custom cron jobs with settings other than Magento application defaults.
In this tutorial, we assume the following:
- The Magento application is installed in
/var/www/html/magento2 - Your Magento database username and password are both
magento - You perform all actions as the Magento file system owner
Step 1: Get a sample module
To set up a custom cron job, you need a sample module. We suggest the magento-module-minimal module.
If you already have a sample module, you can use it; skip this step and the next step and continue with Step 3: Create a class to run cron.
- Log in to your Magento server as, or switch to, the Magento file system owner.
- Change to a directory that is not in your Magento application root (for example, your home directory).
-
Clone the
magento2-samplesrepository.For example,
1
cd ~
1
git clone git@github.com:magento/magento2-samples.git
If the command fails with the error
Permission denied (publickey)., you must add your SSH public key to GitHub.com. -
Make a directory to which to copy the sample code:
1
mkdir -p /var/www/html/magento2/app/code/Magento/SampleMinimal
-
Copy the sample module code:
1
cp -r ~/magento2-samples/sample-module-minimal/* /var/www/html/magento2/app/code/Magento/SampleMinimal
-
Verify the files copied properly:
1
ls -al /var/www/html/magento2/app/code/Magento/SampleMinimal
You should see the following result:
1 2 3 4 5 6 7 8 9
drwxrwsr-x. 4 magento_user apache 4096 Oct 30 13:19 . drwxrwsr-x. 121 magento_user apache 4096 Oct 30 13:19 .. -rw-rw-r--. 1 magento_user apache 372 Oct 30 13:19 composer.json drwxrwsr-x. 2 magento_user apache 4096 Oct 30 13:19 etc -rw-rw-r--. 1 magento_user apache 10376 Oct 30 13:19 LICENSE_AFL.txt -rw-rw-r--. 1 magento_user apache 10364 Oct 30 13:19 LICENSE.txt -rw-rw-r--. 1 magento_user apache 1157 Oct 30 13:19 README.md -rw-rw-r--. 1 magento_user apache 270 Oct 30 13:19 registration.php drwxrwsr-x. 3 magento_user apache 4096 Oct 30 13:19 Test -
Update the Magento database and schema:
1
bin/magento setup:upgrade
-
Clean the cache:
1
bin/magento cache:clean
Step 2: Verify the sample module
Before you continue, make sure the sample module is registered and enabled.
-
Run the following command:
1
bin/magento module:status
-
Make sure that the module’s name is displaying under
List of enabled modules:.1 2 3 4 5 6 7
List of enabled modules: ... Magento_SampleMinimal ... List of disabled modules: None
If the module does not display, review step 1 carefully. Make sure your code is in the correct directory. Spelling and case are important; if anything is different, the module won’t load. Also, don’t forget to run magento setup:upgrade.
Step 3: Create a class to run cron
This step shows a simple class to create a cron job. The class only writes a row to the cron_schedule table that confirms it’s set up successfully.
-
Create a directory for the class and change to that directory:
1
mkdir /var/www/html/magento2/app/code/Magento/SampleMinimal/Cron && cd /var/www/html/magento2/app/code/Magento/SampleMinimal/Cron
-
Created a file named
Test.phpin that directory with the following contents:1 2 3 4 5 6 7 8 9 10 11 12 13 14 15 16 17 18 19 20 21
<?php namespace Magento\SampleMinimal\Cron; use Psr\Log\LoggerInterface; class Test { protected $logger; public function __construct(LoggerInterface $logger) { $this->logger = $logger; } /** * Write to system.log * * @return void */ public function execute() { $this->logger->info('Cron Works'); } }
Step 4: Create crontab.xml
crontab.xml sets a schedule to run your custom cron code.
Create crontab.xml as follows in the /var/www/html/magento2/app/code/Magento/SampleMinimal/etc directory:
1
2
3
4
5
6
7
8
<?xml version="1.0"?>
<config xmlns:xsi="http://www.w3.org/2001/XMLSchema-instance" xsi:noNamespaceSchemaLocation="urn:magento:module:Magento_Cron:etc/crontab.xsd">
    <group id="default">
        <job name="custom_cronjob" instance="Magento\SampleMinimal\Cron\Test" method="execute">
            <schedule>* * * * *</schedule>
        </job>
    </group>
</config>
The preceding crontab.xml runs the Magento/SampleMinimal/Cron/Test.php class once per minute, resulting in a row being added to the cron_schedule table.
In order to make the cron schedule configurable from the admin panel, use the configuration path of your system configuration field.
1
2
3
4
5
6
7
8
<?xml version="1.0"?>
<config xmlns:xsi="http://www.w3.org/2001/XMLSchema-instance" xsi:noNamespaceSchemaLocation="urn:magento:module:Magento_Cron:etc/crontab.xsd">
    <group id="default">
        <job name="custom_cronjob" instance="Magento\SampleMinimal\Cron\Test" method="execute">
            <config_path>system/config/path</config_path>
        </job>
    </group>
</config>
Where, system/config/path is a system configuration path defined in etc/adminhtml/system.xml of a module.
Step 5: Compile and cache clean
Compile the code with this command:
1
bin/magento setup:di:compile
and clean the cache with this command:
1
bin/magento cache:clean
Step 6: Verify the cron job
This step shows how to verify the custom cron job successfully using a SQL query on the cron_schedule database table.
-
Run Magento cron jobs:
1
bin/magento cron:run
-
Enter the
magento cron:runcommand two or three times.The first time you enter the command, it queues jobs; subsequently, the cron jobs are run. You must enter the command at least twice.
-
Run the SQL query
SELECT * from cron_schedule WHERE job_code like '%custom%'as follows:- Enter
mysql -u magento -p - At the
mysql>prompt, enteruse magento; -
Enter
SELECT * from cron_schedule WHERE job_code like '%custom%';The result should be similar to the following:
1
2
3
4
5
6
7
8
+-------------+----------------+---------+----------+---------------------+---------------------+---------------------+---------------------+
| schedule_id | job_code       | status  | messages | created_at        | scheduled_at        | executed_at         | finished_at     |
+-------------+----------------+---------+----------+---------------------+---------------------+---------------------+---------------------+
|        3670 | custom_cronjob | success | NULL     | 2016-11-02 09:38:03 | 2016-11-02 09:38:00 | 2016-11-02 09:39:03 | 2016-11-02 09:39:03 |
|        3715 | custom_cronjob | success | NULL     | 2016-11-02 09:53:03 | 2016-11-02 09:53:00 | 2016-11-02 09:54:04 | 2016-11-02 09:54:04 |
|        3758 | custom_cronjob | success | NULL     | 2016-11-02 10:09:03 | 2016-11-02 10:09:00 | 2016-11-02 10:10:03 | 2016-11-02 10:10:03 |
|        3797 | custom_cronjob | success | NULL     | 2016-11-02 10:24:03 | 2016-11-02 10:24:00 | 2016-11-02 10:25:03 | 2016-11-02 10:25:03 |
+-------------+----------------+---------+----------+---------------------+---------------------+---------------------+---------------------+
- Enter
-
(Optional) Verify messages are written to Magento’s system log:
1
cat /var/www/html/magento2/var/log/system.log
You should see one or more entries like the following:
1
[2016-11-02 22:17:03] main.INFO: Cron Works [] []
These messages come from the
executemethod inTest.php:1 2
public function execute() { $this->logger->info('Cron Works');
If the SQL command and system log contain no entries, run the magento cron:run command a few more times and wait. It can take some time for the database to update.
Step 7 (optional): Set up a custom cron group
This step shows how to optionally set up a custom cron group. You should set up a custom cron group if you want your custom cron job to run on a different schedule than other cron jobs (typically, once per minute) or if you want several custom cron jobs to run with different settings.
- Open
crontab.xmlin a text editor. - Change
<group id="default">to<group id="custom_crongroup"> - Exit the text editor.
-
Create
/var/www/html/magento2/app/code/Magento/SampleMinimal/etc/cron_groups.xmlwith the following contents:1 2 3 4 5 6 7 8 9 10 11 12
<?xml version="1.0"?> <config xmlns:xsi="http://www.w3.org/2001/XMLSchema-instance" xsi:noNamespaceSchemaLocation="urn:magento:module:Magento_Cron:etc/cron_groups.xsd"> <group id="custom_crongroup"> <schedule_generate_every>1</schedule_generate_every> <schedule_ahead_for>4</schedule_ahead_for> <schedule_lifetime>2</schedule_lifetime> <history_cleanup_every>10</history_cleanup_every> <history_success_lifetime>60</history_success_lifetime> <history_failure_lifetime>600</history_failure_lifetime> <use_separate_process>1</use_separate_process> </group> </config>
For a description of what the options mean, see Configure custom cron jobs and cron groups reference.
Step 8 (optional): Verify your custom cron group
This step shows how to verify your custom cron group using the Magento Admin.
-
Run Magento cron jobs for your custom group:
1
php /var/www/html/magento2/bin/magento cron:run --group="custom_crongroup"
Run the command at least twice.
-
Clean the Magento cache:
1
php /var/www/html/magento2/bin/magento cache:clean
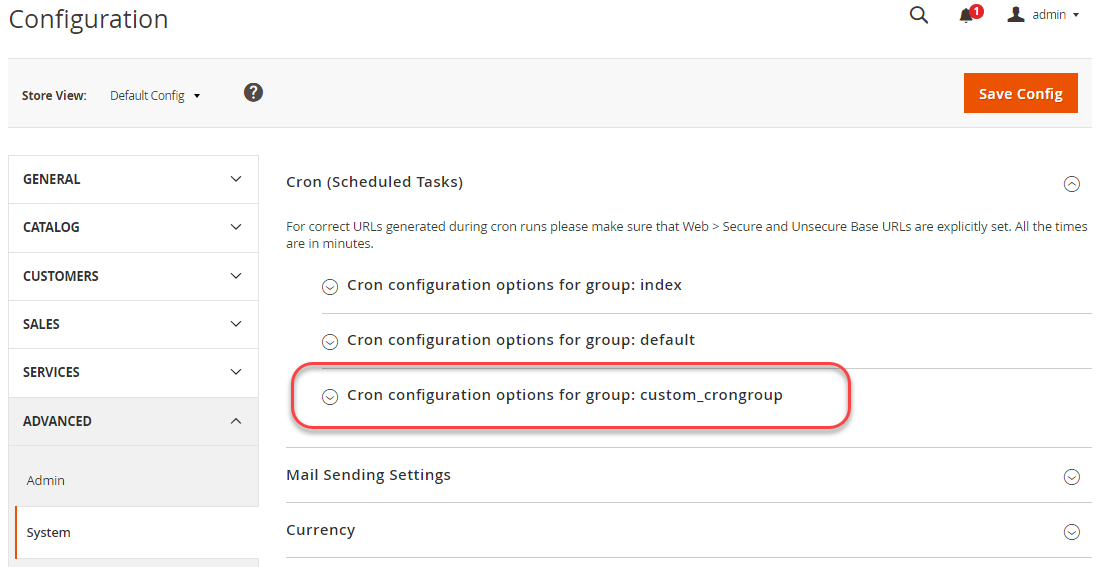
- Log in to the Magento Admin as an administrator.
- Click Stores > Settings > Configuration > Advanced > System.
-
In the right pane, expand Cron.
Your cron group displays as follows: