Routing
In web applications, such as Magento, routing is the act of providing data from a URL request to the appropriate class for processing. Magento routing uses the following flow:
index.php -> HTTP application -> FrontController -> Routing -> Controller processing -> etc
FrontController class
The FrontController class class searches through a list of routers, provided by the RouterList class, until it matches one that can process a request.
When the FrontController finds a matching router, it dispatches the request to an action class returned by the router.
If the FrontController cannot find a router to process a request, it uses the default router.
Router class
The Router class matches a request to an action class that processes the request.
The following tables show the core routers that come with Magento:
frontend area routers:
| Name | Sort order | Description |
|---|---|---|
| robots | 10 | Matches request to the robots.txt file |
| urlrewrite | 20 | Matches requests with URL defined in the database |
| standard | 30 | The standard router |
| cms | 60 | Matches requests for CMS pages |
| default | 100 | The default router |
adminhtml area routers:
| Name | Sort order | Description |
|---|---|---|
| admin | 10 | Matches requests in the Magento admin area |
| default | 100 | The default router for the admin area |
Standard router
A Magento URL that uses the standard router has the following format:
1
<store-url>/<store-code>/<front-name>/<controller-name>/<action-name>
Where:
<store-url>- specifies the base URL for the Magento instance<store-code>- specifies the store context<front-name>- specifies thefrontNameof the FrontController to use<controller-name>- specifies the name of the controller<action-name>- specifies the action class to execute on the controller class
The standard router parses this URL format and matches it to the correct controller and action.
Default router
The default router, defined by the DefaultRouter class, is the last router Magento checks during the routing process.
Requests that reach this point often contain invalid URLs that previous routers cannot handle.
Magento uses the default NoRouteHandler to process these requests, but you can write your own no-route handler by implementing the NoRouteHandlerInterface.
Custom routers
Create an implementation of RouterInterface to create a custom router, and
define the match() function in this class to use your own route matching logic.
If you need route configuration data, use the Route Config class.
To add your custom router to the list of routers for the FrontController, add the following entry in your module’s di.xml file:
1
2
3
4
5
6
7
8
9
10
11
<type name="Magento\Framework\App\RouterList">
    <arguments>
        <argument name="routerList" xsi:type="array">
            <item name="%name%" xsi:type="array">
                <item name="class" xsi:type="string">%classpath%</item>
                <item name="disable" xsi:type="boolean">false</item>
                <item name="sortOrder" xsi:type="string">%sortorder%</item>
            </item>
        </argument>
    </arguments>
</type>
Where:
%name%- The unique name of your router in Magento.%classpath%- The path to your router class. Example:Magento\Robots\Controller\Router%sortorder%- The sort order of this entry in the router list.
routes.xml
The routes.xml file maps which module to use for a URL with a specific frontName and area.
The location of the routes.xml file in a module, either etc/frontend or etc/adminhtml, specifies where those routes are active.
The content of this file uses the following format:
1
2
3
4
5
6
7
<config xmlns:xsi="http://www.w3.org/2001/XMLSchema-instance" xsi:noNamespaceSchemaLocation="urn:magento:framework:App/etc/routes.xsd">
    <router id="%routerId%">
        <route id="%routeId%" frontName="%frontName%">
            <module name="%moduleName%"/>
        </route>
    </router>
</config>
Where:
%routerId- specifies the name of the router in Magento. See the reference tables in the Router class section.%routeId%- specifies the unique node id for this route in Magento, is also the first segment of its associated layout handle XML filename (routeId_controller_action.xml).%frontName%- specifies the first segment after the base URL of a request.%moduleName%- specifies the name of your module.
For more details, see routes.xsd.
Before and after parameters
You can add a before or after parameter in the module entry to override or extend routes in existing modules.
Example: routes.xml:
1
2
3
4
5
6
7
<config xmlns:xsi="http://www.w3.org/2001/XMLSchema-instance" xsi:noNamespaceSchemaLocation="urn:magento:framework:App/etc/routes.xsd">
    <router id="standard">
        <route id="customer">
            <module name="OrangeCompany_RoutingExample" before="Magento_Customer" />
        </route>
    </router>
</config>
This configuration tells the FrontController to look for actions in the OrangeCompany_RoutingExample module before searching in the Magento_Customer module.
If app/code/OrangeCompany/RoutingExample/Controller/Account/Login.php exists, it will use that file for processing the login route instead of the original class.
Action class
Action classes are extensions of the Action class that a router returns on matched requests.
The execute() function in these classes contain the logic for dispatching requests.
Each Action should implement one or more Magento\Framework\App\Action\HttpHTTP MethodActionInterface to declare which HTTP request methods it can process.
Magento has a form key validation in place for all POST non-AJAX requests - if your Action doesn’t need that validation or you want to modify it you can implement CsrfAwareActionInterface.
If you need to forward a request to another action in your class, use the _forward() function.
Example:
1
$this->_forward('action', 'controller', 'Other_Module')
Use the ActionFactory in your router to create an instance of an Action class.
Action class should return a result object.
Result object
| Name | Description |
|---|---|
json |
Sets Content-Type:application/json in the header and returns a json encoded representation of an array with data |
raw |
Returns the data as it’s been set. Does not set a Content-Type in the header |
redirect |
Creates an external redirect, which the browser follows and requests a new url |
forward |
Internally calls the execute method of another action class and does not trigger a new request from the browser. The URL stays the same |
layout |
View result. You can use a generic layout response to render any kind of layout. The layout comprises a response body from its layout elements and sets it to the HTTP response |
page |
View result. Encapsulates page type, page configuration, and imposes certain layout handles. page triggers layout.xml to render into HTML |
Example of routing usage
Declaring a new route:
1
2
3
4
5
6
7
8
9
10
<?xml version="1.0"?>

<config xmlns:xsi="http://www.w3.org/2001/XMLSchema-instance"
        xsi:noNamespaceSchemaLocation="urn:magento:framework:App/etc/routes.xsd">
    <router id="standard">
        <route id="routing" frontName="routing">
            <module name="OrangeCompany_RoutingExample" />
        </route>
    </router>
</config>
Declaring the layout handler for our new route:
1
2
3
4
5
6
7
8
9
10
11
12
<?xml version="1.0"?>

<page xmlns:xsi="http://www.w3.org/2001/XMLSchema-instance"
        xsi:noNamespaceSchemaLocation="urn:magento:framework:View/Layout/etc/page_configuration.xsd">
    <body>
        <referenceBlock name="page.main.title">
            <action method="setPageTitle">
                <argument translate="true" name="title" xsi:type="string">Routing Page</argument>
            </action>
        </referenceBlock>
    </body>
</page>
Defining a new custom router:
1
2
3
4
5
6
7
8
9
10
11
<type name="Magento\Framework\App\RouterList">
    <arguments>
        <argument name="routerList" xsi:type="array">
            <item name="routingExample" xsi:type="array">
                <item name="class" xsi:type="string">OrangeCompany\RoutingExample\Controller\Router</item>
                <item name="disable" xsi:type="boolean">false</item>
                <item name="sortOrder" xsi:type="string">40</item>
            </item>
        </argument>
    </arguments>
</type>
Creating the controller that will handle the routing route and will get the parameters passed by our router.
1
2
3
4
5
6
7
8
9
10
11
12
13
14
15
16
17
18
19
20
21
22
23
24
25
26
27
28
29
30
31
32
33
34
35
36
37
38
39
40
41
42
43
44
45
46
47
<?php
declare(strict_types=1);

namespace OrangeCompany\RoutingExample\Controller\Index;

use Magento\Framework\App\Action\Action;
use Magento\Framework\App\Action\Context;
use Magento\Framework\App\ResponseInterface;
use Magento\Framework\Controller\ResultInterface;
use Magento\Framework\View\Result\Page;
use Magento\Framework\View\Result\PageFactory;

/**
 * Class Index
 */
class Index extends Action
{
    /**
     * @var PageFactory
     */
    private $pageFactory;

    /**
     * @param Context $context
     * @param PageFactory $pageFactory
     */
    public function __construct(
        Context $context,
        PageFactory $pageFactory
    ) {
        parent::__construct($context);

        $this->pageFactory = $pageFactory;
    }

    /**
     * @return ResponseInterface|ResultInterface|Page
     */
    public function execute()
    {
        // Get the params that were passed from our Router
        $firstParam = $this->getRequest()->getParam('first_param', null);
        $secondParam = $this->getRequest()->getParam('second_param', null);

        return $this->pageFactory->create();
    }
}
In the end, let’s create the router class, that will match the custom route name learning with the existing routing route.
1
2
3
4
5
6
7
8
9
10
11
12
13
14
15
16
17
18
19
20
21
22
23
24
25
26
27
28
29
30
31
32
33
34
35
36
37
38
39
40
41
42
43
44
45
46
47
48
49
50
51
52
53
54
55
56
57
58
59
60
61
62
63
64
<?php
declare(strict_types=1);

namespace OrangeCompany\RoutingExample\Controller;

use Magento\Framework\App\Action\Forward;
use Magento\Framework\App\ActionFactory;
use Magento\Framework\App\ActionInterface;
use Magento\Framework\App\RequestInterface;
use Magento\Framework\App\ResponseInterface;
use Magento\Framework\App\RouterInterface;

/**
 * Class Router
 */
class Router implements RouterInterface
{
    /**
     * @var ActionFactory
     */
    private $actionFactory;

    /**
     * @var ResponseInterface
     */
    private $response;

    /**
     * Router constructor.
     *
     * @param ActionFactory $actionFactory
     * @param ResponseInterface $response
     */
    public function __construct(
        ActionFactory $actionFactory,
        ResponseInterface $response
    ) {
        $this->actionFactory = $actionFactory;
        $this->response = $response;
    }

    /**
     * @param RequestInterface $request
     * @return ActionInterface|null
     */
    public function match(RequestInterface $request): ?ActionInterface
    {
        $identifier = trim($request->getPathInfo(), '/');

        if (strpos($identifier, 'learning') !== false) {
            $request->setModuleName('routing');
            $request->setControllerName('index');
            $request->setActionName('index');
            $request->setParams([
                'first_param' => 'first_value',
                'second_param' => 'second_value'
            ]);

            return $this->actionFactory->create(Forward::class, ['request' => $request]);
        }

        return null;
    }
}
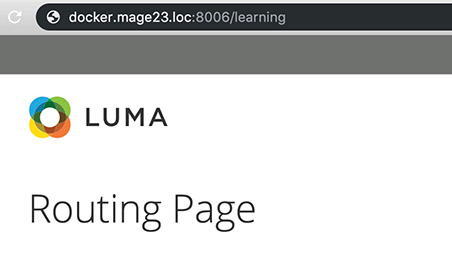
As a result, by accessing the http://site.com/learning route, the http://site.com/routing/index/index route is loaded.
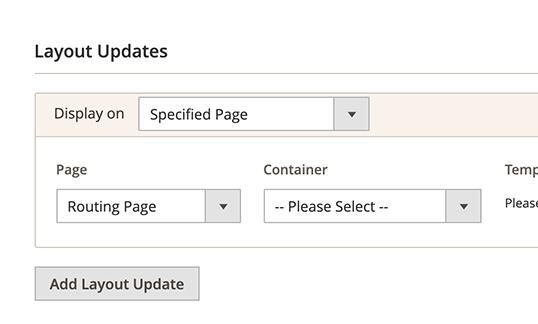
Declaring the new route as Page Type
After creating a new route routing/index/index, it is a good practice to give more control on it for the admin. By creating a new Page Type, the admin can manage the content of this page using widgets.
Defining a new page type:
etc/frontend/page_types.xml
1
2
3
4
<?xml version="1.0"?>
<page_types xmlns:xsi="http://www.w3.org/2001/XMLSchema-instance" xsi:noNamespaceSchemaLocation="urn:magento:framework:View/Layout/etc/page_types.xsd">
    <type id="routing_index_index" label="Routing Page"/>
</page_types>
The routing_index_index represents the path for the new route.
Result
As result, the new page is available in the Specified Page dropdown widget when creating a page.