Data Migration Tool Technical Specification
Overview
This section describes an implementation details of Data Migration Tool and how to extend its functionality.
Repositories
Data Migration Tool repository migration-tool
System requirements
Same as for Magento2.
Internal structure
Directory structure
The following diagram represents directory structure of Data Migration Tool:
├── etc                                    --- all configuration files
│   ├── opensource-to-opensource            --- configuration files for migration from Magento Open Source 1 to Magento Open Source 2
│   │   ├── 1.9.1.1
│   │   │   ├── config.xml.dist
│   │   │   └── map.xml.dist
│   │   ├── 1.9.2.0
│   │   │   ├── config.xml.dist
│   │   │   └── map.xml.dist
│   │   ├── ........
│   │   ├── class-map.xml.dist
│   │   ├── deltalog.xml.dist
│   │   └── settings.xml.dist
│   │   ├── ........
│   ├── opensource-to-commerce              --- configuration files for migration from Magento Open Source 1 to Magento Commerce 2
│   ├── commerce-to-commerce                --- configuration files for migration from Magento Commerce 1 to Magento Commerce 2
│   ├── class-map.xsd
│   ├── config.xsd
│   ├── map.xsd
│   └── settings.xsd
├── src
│   └── Migration
│       ├── App                             --- application framework
│       ├── Console
│       ├── Handler                         --- handlers are used by map files
│       │   ├── AbstractHandler.php
│       │   ├── AddPrefix.php
│       │   ├── ConvertIp.php
│       │   ├── ........
│       ├── Logger
│       ├── Reader
│       ├── Mode
│       │   ├── AbstractMode.php
│       │   ├── Data.php
│       │   ├── Delta.php
│       │   └── Settings.php
│       ├── ResourceModel                   --- contains [adapter](https://glossary.magento.com/adapter) for connection to data storage and classes to work with structured data
│       │   ├── Adapter
│       │   │   └── Mysql.php
│       │   ├── AbstractCollection.php
│       │   ├── AbstractResource.php
│       │   ├── AdapterInterface.php
│       │   ├── Destination.php
│       │   ├── Document.php
│       │   ├── Record.php
│       │   ├── Source.php
│       │   └── Structure.php
│       ├── Config.php
│       ├── [Exception](https://glossary.magento.com/exception).php
│       └── Step                            --- functionality for migrating specific data
│           ├── Eav
│           │   ├── Data.php
│           │   ├── Helper.php
│           │   ├── InitialData.php
│           │   ├── Integrity.php
│           │   └── Volume.php
│           ├── Map
│           │   ├── Data.php
│           │   ├── Delta.php
│           │   ├── Helper.php
│           │   ├── Integrity.php
│           │   └── Volume.php
│           ├── UrlRewrite
│           │   ├── Version11300to2000.php
│           │   ├── Version11410to2000.php
│           │   └── Version191to2000.php
│           ├── ..........
└── tests
    ├── integration
    ├── static
    └── unit
Entry Point
Script that runs migration process is located at magento-root/bin/magento
Configuration
The Schema for configuration file config.xsd is placed under etc/directory. Default configuration file config.xml.dist is created for each version of Magento 1.x. It is placed in separate directories under etc/.
Default configuration file can be replaced by custom one (see command syntax).
Configuration file has the following structure:
1
2
3
4
5
6
7
8
9
10
11
12
13
14
15
16
17
18
19
20
21
22
23
24
25
26
27
28
29
30
31
32
33
34
35
36
37
38
<config xmlns:xs="http://www.w3.org/2001/XMLSchema-instance" xs:noNamespaceSchemaLocation="config.xsd">
    <steps mode="settings">
        <step title="Settings step">
            <integrity>Migration\Step\Settings</integrity>
            <data>Migration\Step\Settings</data>
        </step>
    </steps>
    <steps mode="data">
        <step title="Map step">
            <integrity>Migration\Step\Map\Integrity</integrity>
            <data>Migration\Step\Map\Data</data>
            <volume>Migration\Step\Map\Volume</volume>
        </step>
        ...
    </steps>
    <steps mode="delta">
        <step title="Map step">
            <delta>Migration\Step\Map\Delta</delta>
            <volume>Migration\Step\Map\Volume</volume>
        </step>
        ...
    </steps>
    <source>
        <database host="localhost" name="magento1" user="root" password=""/>
    </source>
    <destination>
        <database host="localhost" name="magento2" user="root" password=""/>
    </destination>
    <options>
        <map_file>map-file.xml</map_file>
        <settings_map_file>settings-map-file.xml</settings_map_file>
        <bulk_size>100</bulk_size>
        <custom_option>custom_option_value</custom_option>
        <source_prefix />
        <dest_prefix />
        ...
    </options>
</config>
-
steps - describes all steps that are processed during migration
-
source - configuration for data source. Available source types: database
-
destination - configuration for data destination. Available destination types: database
-
options - list of parameters. Contains both mandatory (map_file, settings_map_file, bulk_size) and optional (custom_option, resource_adapter_class_name, prefix_source, prefix_dest, log_file) parameters
Change prefix option in case Magento was installed with prefix in database tables. It can be set for Magento 1 and Magento 2 databases. Use the “source_prefix” and “dest_prefix” configuration options accordingly.
Configuration data is accessible via \Migration\Config class.
Connect using the TLS protocol
You can also connect to a database using the TLS protocol (i.e., using public/private cryptographic keys). Add the following optional attributes to the database element:
ssl_cassl_certssl_key
For example:
1
2
3
4
5
6
<source>
    <database host="localhost" name="magento1" user="root" ssl_ca="/path/to/file" ssl_cert="/path/to/file" ssl_key="/path/to/file"/>
</source>
<destination>
    <database host="localhost" name="magento2" user="root" ssl_ca="/path/to/file" ssl_cert="/path/to/file" ssl_key="/path/to/file"/>
</destination>
Step internals
The migration process consists of steps.
Step is a unit that provides functionality required for migration some separated data. Step can consist of one or more stages e.g. integrity check, data, volume check, delta.
By default, there are several steps (Map, EAV, URL Rewrites, and so on). You can optionally add your own steps as well.
Steps related classes are located in the src/Migration/Step directory.
To execute a Step class, the class must be defined in config.xml file.
1
2
3
4
5
6
7
8
9
10
11
<config xmlns:xs="http://www.w3.org/2001/XMLSchema-instance" xs:noNamespaceSchemaLocation="config.xsd">
    <steps mode="mode_name">
        <step title="Step Name">
            <integrity>Migration\Step\StepName\Integrity</integrity>  <!-- integrity check stage of the step -->
            <data>Migration\Step\StepName\Data</data>
            <volume>Migration\Step\StepName\Volume</volume>
        </step>
        ...
    </steps>
    ...
</config>
Every stage class must implement StageInterface.
1
2
3
4
5
6
7
8
9
10
11
class StageClass implements StageInterface
{
  /**
   * Perform the stage
   *
   * @return bool
   */
  public function perform()
  {
  }
}
If the data stage supports rollback, it should implement the RollbackInterface interface.
Visualization of the running step is provided by Symfony’s ProgressBar component (see http://symfony.com/doc/current/components/console/helpers/progressbar.html). Access this component in a step as LogLevelProcessor.
Main methods for use are:
1
2
3
$this->progress->start();
$this->progress->advance();
$this->progress->finish();
Step stages
Integrity check
Each step has to check that the structure of data source (Magento 1 by default) and the structure of data destination (Magento 2) are compatible. If not - an error will be shown with entities that are not compatible. In case when fields have different datatypes (e.g. the same field has decimal datatype in Magento 1 and integer in Magento 2), a warning message will be shown (except when it was covered in Map file).
Data Transfer
In case integrity check passed, transferring data is running. If some error appears then rollback will run to revert to previous state of Magento 2. If a step class implements RollbackInterface then “rollback” method will be executed in case of error.
Volume check
After data has been migrated Volume Check provides additional check that all data was transferred correctly.
Delta delivery
Delta functionality is responsible for delivering the rest of data that was added after main migration.
Running modes
The tool should be run in three different modes in particular order:
- settings - migration of system settings
- data - main migration of data
- delta - migration of the rest of data that was added after main migration
Each mode has its own list of steps to be executed. See config.xml
Settings migration mode
Settings migration mode of this tool is used to transfer following entities:
- Websites, stores, store views.
- Store configuration (mainly Stores->Configuration in M2 or System->Configuration in M1)
All store configuration keeps its data in core_config_data table in database. settings.xml file contains rules for this table that are applied during migration process. This file describes settings that should be ignored, renamed or should change their values. settings.xml file has the following structure:
1
2
3
4
5
6
7
8
9
10
11
12
13
14
15
16
17
18
<?xml version="1.0" encoding="UTF-8"?>
<settings xmlns:xs="http://www.w3.org/2001/XMLSchema-instance" xs:noNamespaceSchemaLocation="settings.xsd">
    <key>
        <ignore>
            <path>path/to/ignore*</path>
        </ignore>
        <rename>
            <path>path/to/rename</path>
            <to>new/path/renamed</to>
        </rename>
    <key>
    <value>
        <transform>
            <path>some/key/to/change</path>
            <handler class="Some\Handler\Class"/>
        </transform>
    </value>
</settings>
Under node <key> there are rules that work with ‘path’ column of core_config_data table. <ignore> rules make the tool not to transfer some setting. Wildcards can be used in this node. All other settings not listed in <ignore> node, will be migrated. If path of some setting is changed in Magento 2, it should be added to //key/rename node, where old path indicates in //key/rename/path node and new path indicates in //key/rename/to node.
Under node <value> there are rules that work with ‘value’ column of core_config_data table. These rules aim to transform value of settings by handlers (classes that implement Migration\Handler\HandlerInterface) and adapt it for Magento 2.
Data migration mode
In this mode most of the data will be migrated. Before data migration the integrity check stages run for each step. If the integrity check passes, the Data Migration Tool installs deltalog tables (with prefix m2_cl_*) and corresponding triggers to the Magento 1 database and runs data migration stage of steps. When migration is completed without errors, the volume check checks data consistency. It can show a warning message if you migrate the live store. Do not worry, delta migration will take care of this incremental data. The most valuable migration steps are Map, URL Rewrite, and EAV.
Map Step
Map step is responsible for transferring most of data from Magento 1 to Magento 2. This step reads instructions from map.xml file (located in etc dir). The file describes differences between data structures of source (Magento 1) and destination (Magento 2). In case Magento 1 contains tables or fields that belong to some extension that does not exist in Magento 2, then these entities can be placed here to ignore them by Map Step. Otherwise it will show an error message.
Map file has the next format:
1
2
3
4
5
6
7
8
9
10
11
12
13
14
15
16
17
18
19
20
21
22
23
24
25
26
27
28
29
30
31
32
33
34
35
36
37
38
39
40
41
42
43
44
45
46
47
48
49
<?xml version="1.0" encoding="UTF-8"?>
<map xmlns:xs="http://www.w3.org/2001/XMLSchema-instance" xs:noNamespaceSchemaLocation="map.xsd">
    <source>
        <document_rules>
            <ignore>
                <document>some_document2</document>
            </ignore>
            <rename>
                <document>some_document</document>
                <to>some_dest_document</to>
            </rename>
            <log_changes>
                <document key="primary_key">some_dest_document</document>
            </log_changes>
        </document_rules>

        <field_rules>
            <move>
                <field>some_document1.field1</field>
                <to>some_document1.field2</to>
            </move>
            <ignore>
                <field>some_document3.field8</field>
            </ignore>
            <transform>
                <field>some_document1.field1</field>
                <handler class="\Migration\Handler\Convert">
                    <param name="map" value="[value1:value2;value3:value4;value5:value6;]" />
                </handler>
            </transform>
        </field_rules>
    </source>
    <destination>
        <document_rules>
            <ignore>
                <document>some_document8</document>
            </ignore>
        </document_rules>

        <field_rules>
            <transform>
                <field>some_document5.field3</field>
                <handler class="\Migration\Handler\SetValue">
                    <param name="value" value="10" />
                </handler>
            </transform>
        </field_rules>
    </destination>
</map>
Areas:
-
source - contains rules of source database
-
destination - contains rules of destination database
Options:
-
ignore - document, field or datatype marked with this option will be ignored
-
rename - describes name relations between documents with the different name. In a case when destination document name is not the same with the source document - you can use rename option to set source document name similar to destination table name
-
move - sets rule to move specified field from source document to destination document. NOTE: destination document name should be the same with the source document name. If source and destination document names are different - you need to use rename option for document that contains moved field
-
transform - is an option that allows user to migrate fields according to behavior described in handlers
-
handler - describes transformation behavior for fields. To call the handler you need to specify a handler class name in a
tag. Use tag with the parameter name and value data to pass it to handler
Source available operations:
| Document | Field |
|---|---|
| ignore rename | ignore move transform |
Destination available operations:
| Document | Field |
|---|---|
| ignore | ignore transform |
Wildcards
To ignore documents with similar parts (e.g. document_name_1, document_name_2 e.t.c), you can use wildcard functionality. Just put * symbol instead of repeating part (e.g. document_name_*) and this mask will cover all source or destination documents that meet this mask.
URL Rewrite Step
This step is quite complex because there are many different algorithms developed in Magento 1 which are not compatible with Magento 2. For different versions of Magento 1 there can be different algorithms. Thus under Step/UrlRewrite folder there are classes that were developed for some of particular versions of Magento and Migration\Step\UrlRewrite\Version191to2000 is one of them. It can transfer URL Rewrites data from Magento 1.9.1 to Magento 2.
EAV Step
This step transfers all attributes (e.g. product, customer, RMA) from Magento 1 to Magento 2. It uses map-eav.xml file that contains rules similar to the ones in map.xml file for specific cases of processing data.
Some of the tables that are processed in the step:
- eav_attribute
- eav_attribute_group
- eav_attribute_set
- eav_entity_attribute
- catalog_eav_attribute
- customer_eav_attribute
- eav_entity_type
- …
Delta migration mode
After main migration, additional data could have been added to the Magento 1 database (for example, by customers on storefront). To track this data, the Tool sets up the database triggers for tables in the beginning of migration process. For more information, see Migrate data created by 3rd party extensions.
Data Sources
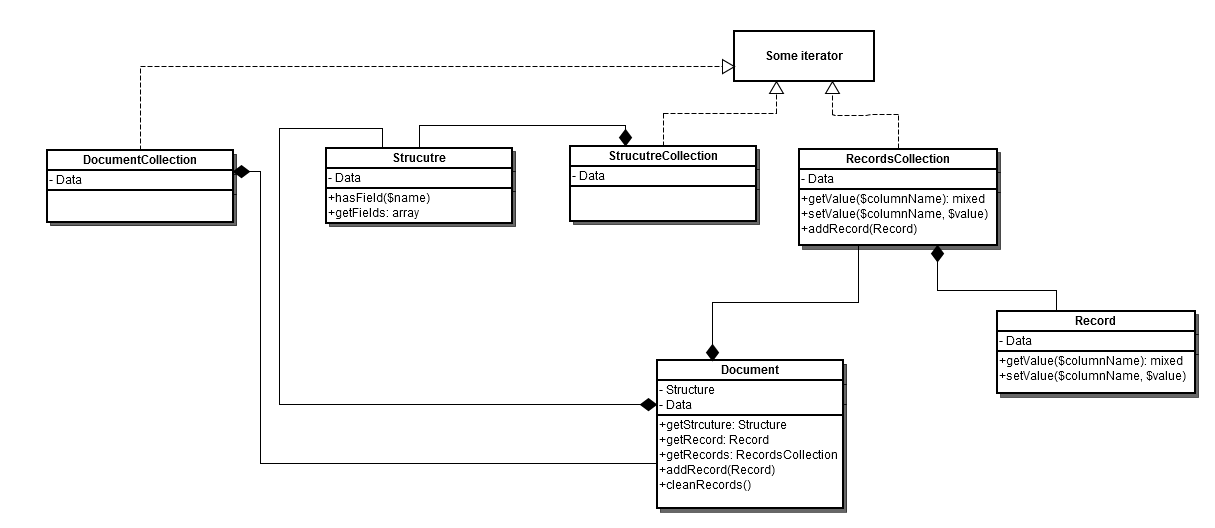
To reach to the data sources of Magento 1 and Magento 2 and operate with its data (select, update, insert, delete) there are many classes in Resource folder. Migration\ResourceModel\Source and Migration\ResourceModel\Destination are main classes. All migration steps use it to operate with data. This data is contained in classes like Migration\ResourceModel\Document, Migration\ResourceModel\Record, Migration\ResourceModel\Structure etc.
Here is a class diagram of these classes:
Logging
In order to implement output of migration process and control all possible levels PSR logger, which is used in Magento, is applied. \Migration\Logger\Logger class was implemented to provide logging functionality. To use the logger you should inject it via constructor dependency injection.
1
2
3
4
5
6
7
8
9
10
11
class SomeClass
{
    ...
    protected $logger;

    public function __construct(\Migration\Logger\Logger $logger)
    {
        $this->logger = $logger;
    }
    ...
}
After that you can use this class for logging of some events:
1
2
3
4
$this->logger->info("Some information message");
$this->logger->debug("Some debug message");
$this->logger->error("Message about error operation");
$this->logger->warning("Some warning message");
There is a possibility to customize where log information should be written. You can do that by adding handler to logger using pushHandler() method of the logger. Each handler should implement \Monolog\Handler\HandlerInterface interface. As for now there are two handlers:
-
ConsoleHandler: writes messages to console
-
FileHandler: writes messages to log file that has been set in “log_file” config option
Also it is possible to implement any additional handler. There is a set of handlers in Magento framework. Example of adding handlers to logger:
1
2
3
// $this->consoleHandler is the object of Migration\Logger\ConsoleHandler class
// $this->logger is the object of Migration\Logger\Logger class
$this->logger->pushHandler($this->consoleHandler);
To set additional data for logger (e.g. current mode, table name e.t.c) you can use logger processors. There is one existing processor (MessageProcessor). It’s created to add “extra” data for logging messages and will be called each time when log method is executed. MessageProcessor has protected $extra var, which contain empty values for ‘mode’, ‘stage’, ‘step’ and ‘table’. Extra data can be passed to processor as a second parameter (context) for log method. Currently additional data sets to processor in AbstractStep->runStage (pass current mode, stage and step to processor) method and data classes where used logger->debug method (pass migrating table name). Example of adding processors to logger:
1
2
3
4
// $this->processoris the object of Migration\Logger\messageProcessor class
// $this->logger is the object of Migration\Logger\Logger class
$this->logger->pushProcessor([$this->processor, 'setExtra']);
// As a second array value you need to pass method that should be executed when processor called
There is a possibility to set the level of verbosity. As for now there are 3 levels: ERROR(writes only errors to the log), INFO(only important information is written to the log, default value), DEBUG(everything is written). Verbosity log level can be set for each handler separately by calling setLevel() method. If you want to set verbosity level via command line parameter, you should change ‘verbose’ option at application launch.
There is a possibility to format log messages via monolog formatter. To make formatter functionality work it needs to be set to specified log handler using setFormatter() method. Currently we have one formatter class (MessageFormatter) that sets certain format (depends on verbosity level) during message handling (via format() method executed from handler).
As for now manipulation with logger, adding handler(s), processor(s) to it and processing verbose mode is performed in process() method of Migration\Logger\Manager class. Mentioned method is called during application start.
Automatic Tests
There are 3 types of tests in Data Migration Tool: static, unit and integration tests. They all are located in tests/ directory of the tool and they are located in folders, which are the same as the type of the test (e.g. unit tests are located in tests/unit folder). To launch the test you should have phpunit installed. In such case you should change current folder to the folder of test and launch phpunit. See the example below.
1
2
[10:32 AM]-[vagrant@debian-70rc1-x64-vbox4210]-[/var/www/magento2/vendor/magento/data-migration-tool]-[git master]
$ cd tests/unit
1
2
3
4
[10:33 AM]-[vagrant@debian-70rc1-x64-vbox4210]-[/var/www/magento2/vendor/magento/data-migration-tool/tests/unit]-[git master]
$ phpunit
PHPUnit 4.1.0 by Sebastian Bergmann.
....